2020 DEF CON quals 小记
比赛时间: 5月16日-5月18日
终于,又一次来到了defcon的预选赛.仍然记得去年自闭了两天只做出来一道misc(锤地).今年仍然是令人自闭的一年.经过两晚奋战到四点的努力,总算做出3道(其实是2道)题.自然收获满满,也学到了很多有意思的东西.
RE
fountain-ooo-reliving
We have found the fountain OOO RElive. By discovering its secrets, you will restart the game of life with a chance to do it all over again. This challenge is in memory of John Conway (26 December 1937 – 11 April 2020).
Files:
- fountain-ooo-relive ee9ac9cde6915708df0ba814f07bdadcf009bb7dabdb2374d220bec4c8d26f22
文件下载下来是个文本,几万行:
1 | [M2] |
一开始我以为是misc,但这道题的分类是reverse
于是开始找资料吧.切入点应该在第一行的[M2]上,以及题目的描述里.根据描述,这道题跟生命游戏(game of life)有关.经过各种关键词的谷歌,找到了一篇文章: Golly help: File format,文中描述的Macrocell format和题目的文件一致.
康威生命游戏
康威生命游戏(元胞自动机)具体是什么呢?可以参考几个wiki:
https://en.wikipedia.org/wiki/Conway%27s_Game_of_Life
https://www.conwaylife.com/wiki/Main_Page
总的来讲每个像素点根据周围格子的像素点的情况,会消亡/生存/繁殖,从而在时间维度上产生一系列变化.值得注意的是,元胞自动机是图灵完备的!
另外之前的De1CTF中,队友SJoshua出过一道生命游戏的题,所以还算有一点点了解.
一开始我还想手动画,后来impakho提醒Golly工具可以直接画出来并运行生命游戏(捂脸
Quest For Tetris Assembly
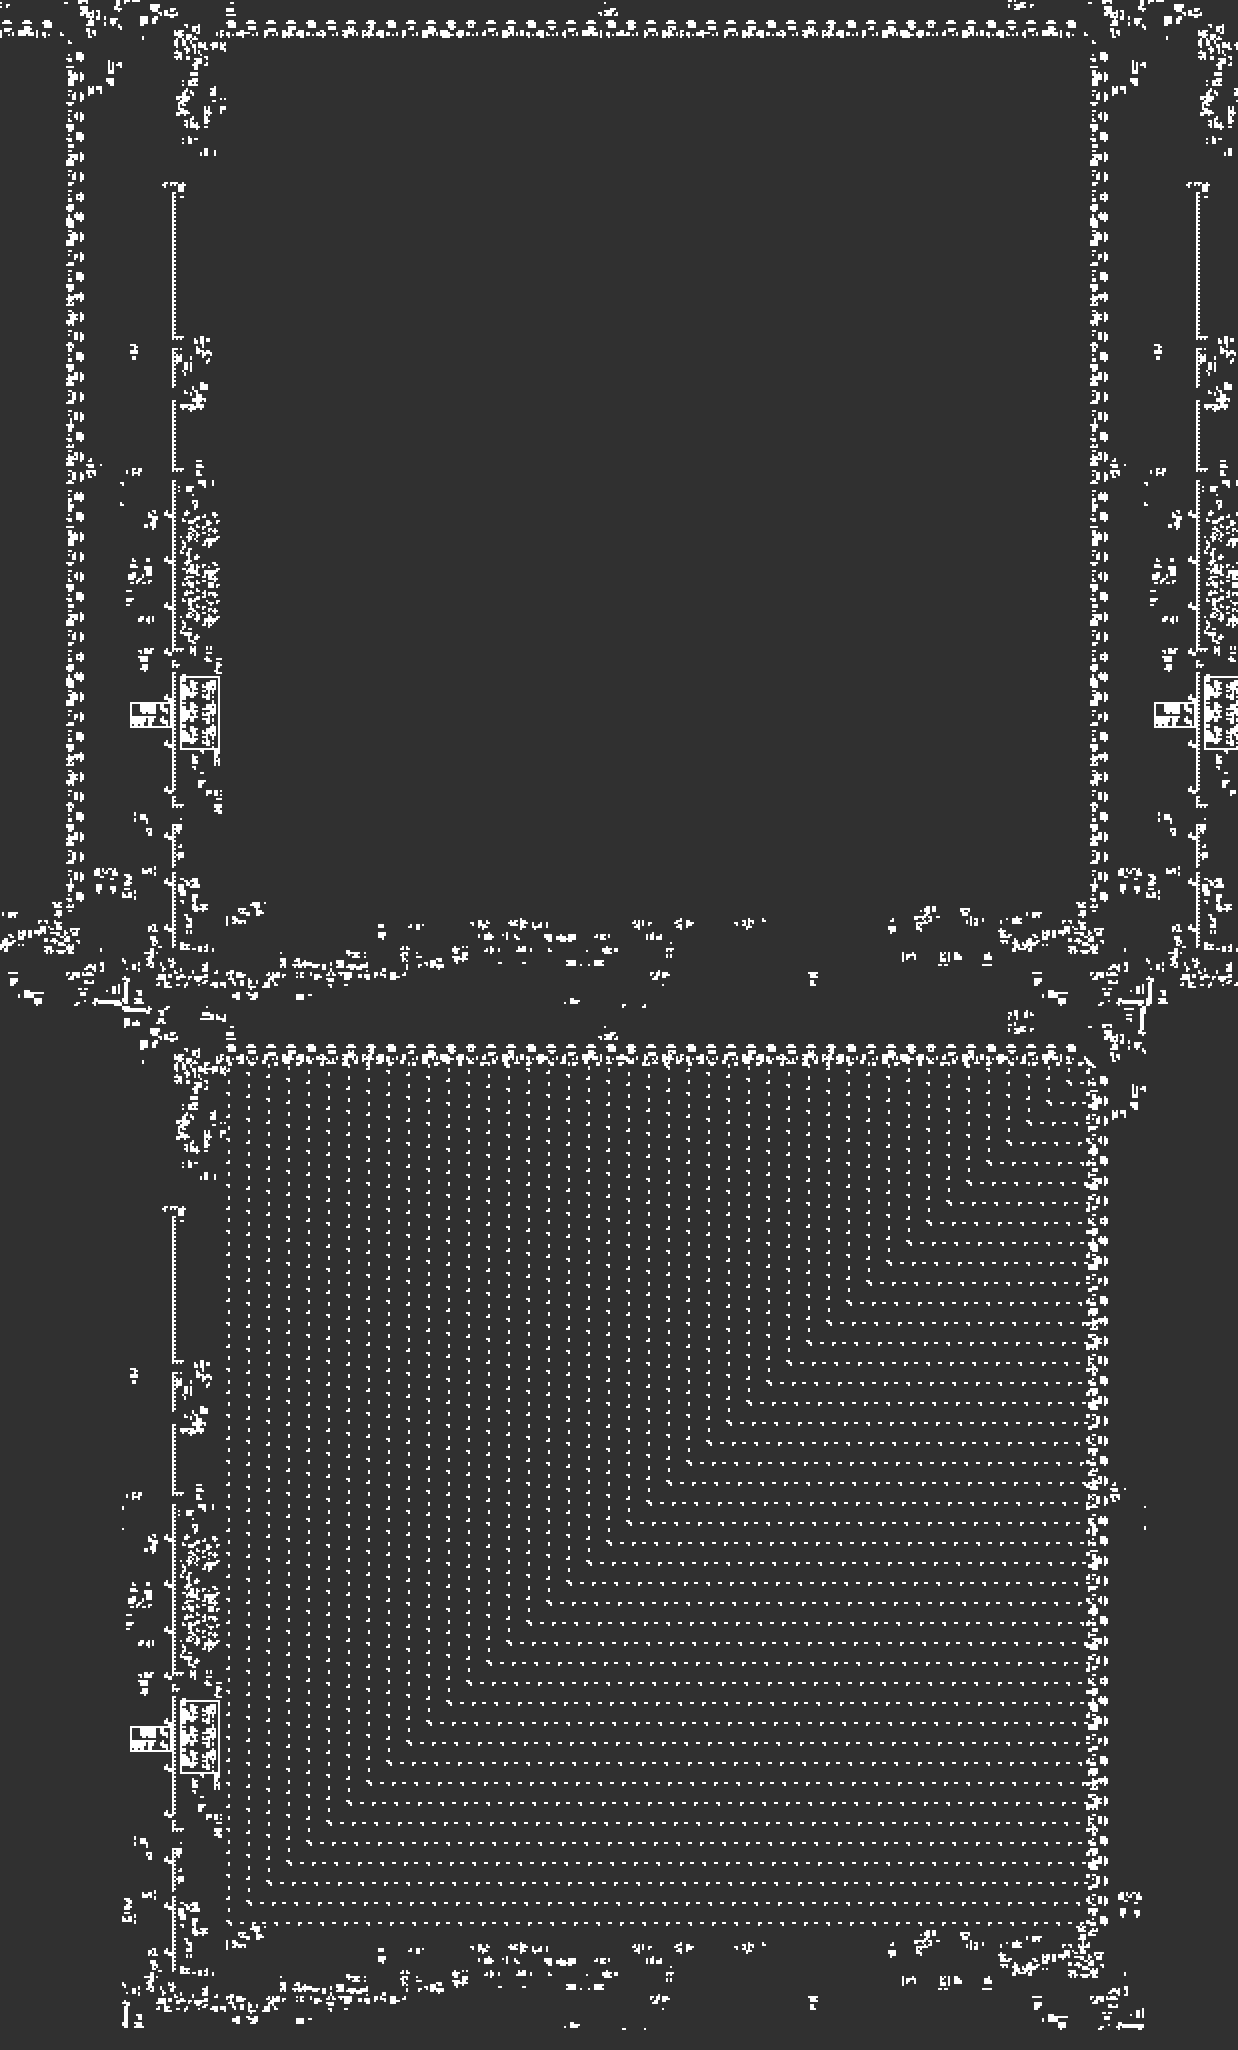
用Golly打开之后我惊呆了,这竟然是一颗CPU!
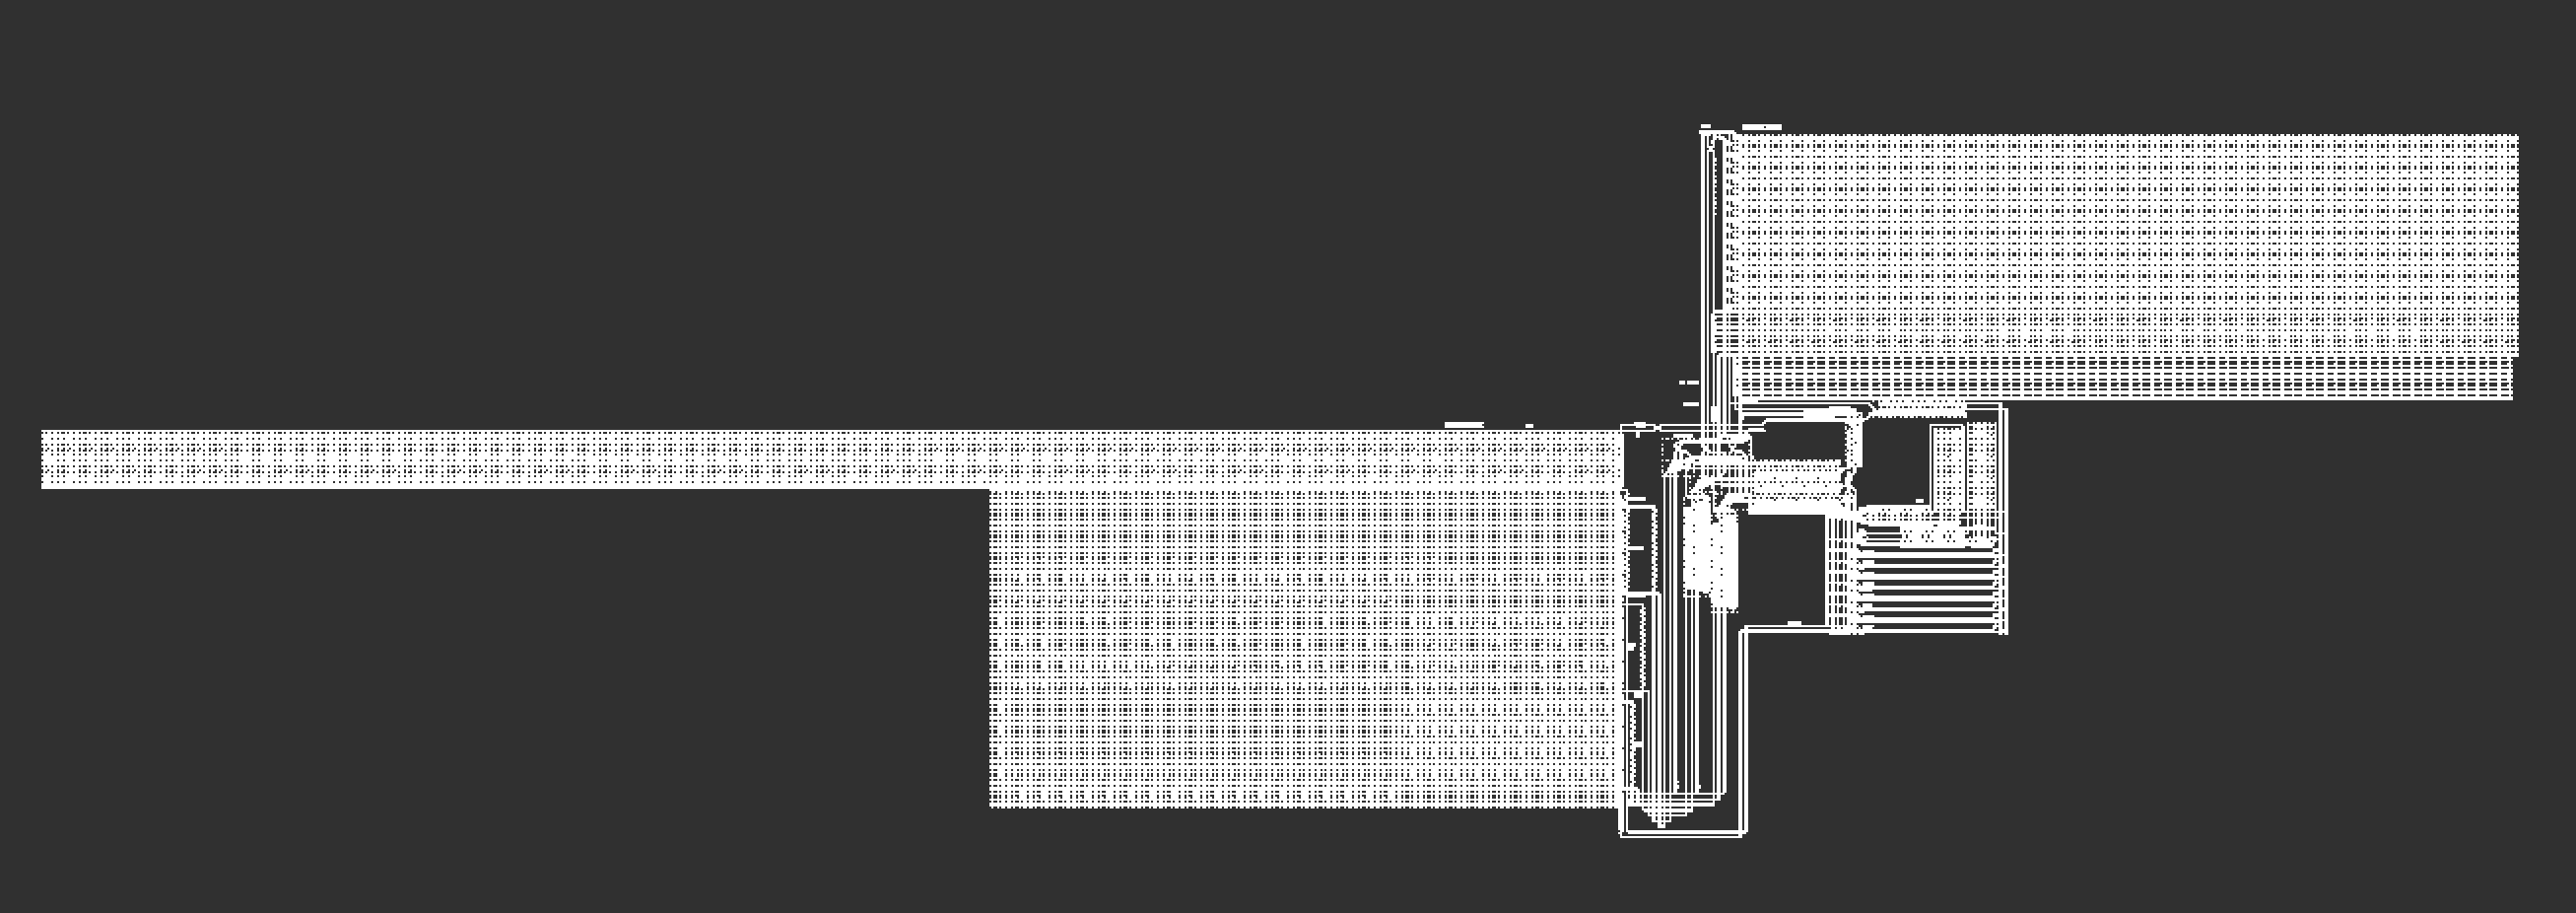
放大看看这些东西:
左边标注了ROM,每一个格子都存放了一个bit的数据.

这里有ALU,可以看到9种opcode进入ALU进行运算

右上方是RAM,每一个小格子里面是一个bit,一共是72*16,一个地址是16bit的宽度.
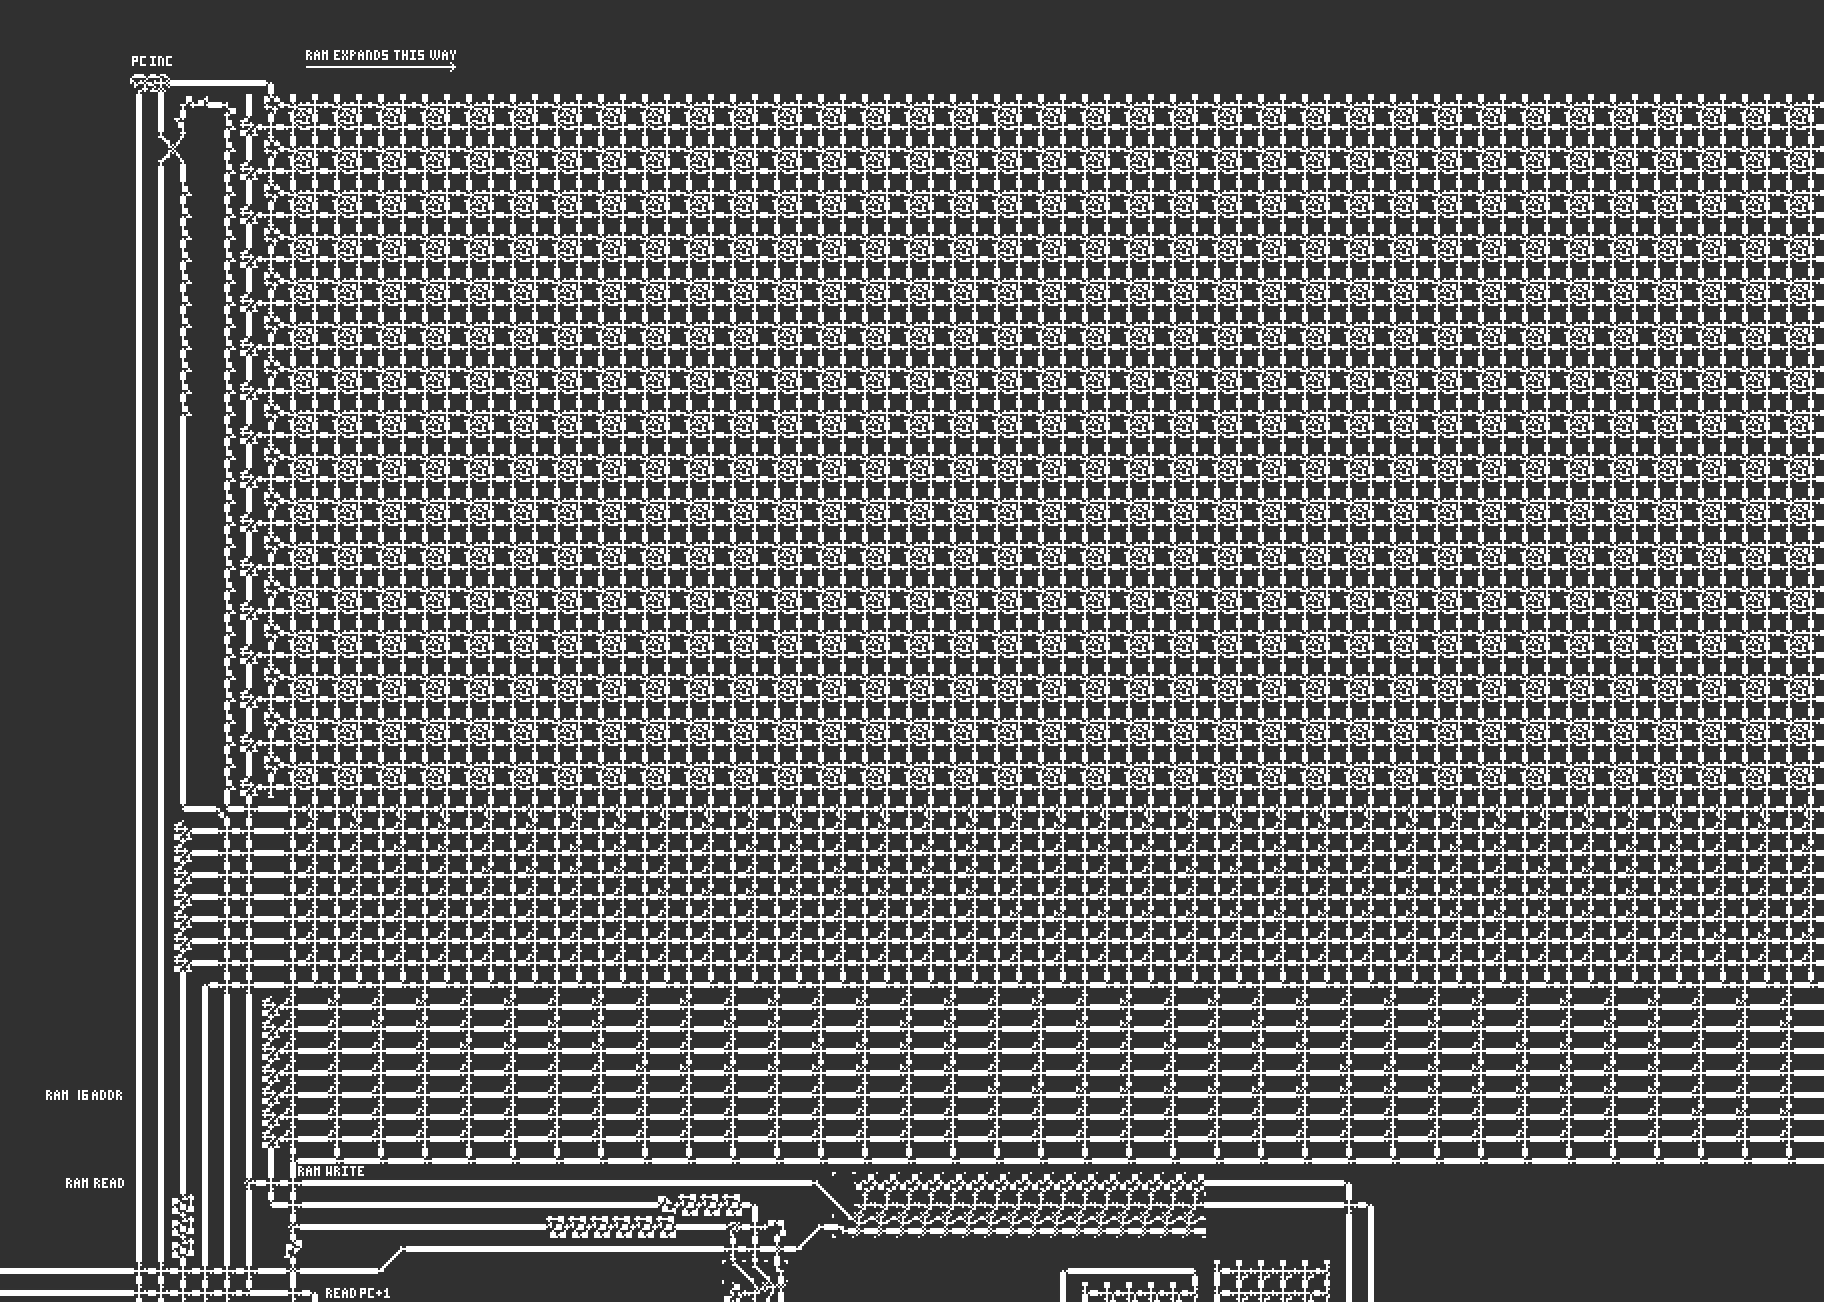
中间是总线,连接着RAM,ROM,和ALU.
如果继续放大,图里的每一个像素点并不是一个点,而是这样的结构,以开关ON这里为例:
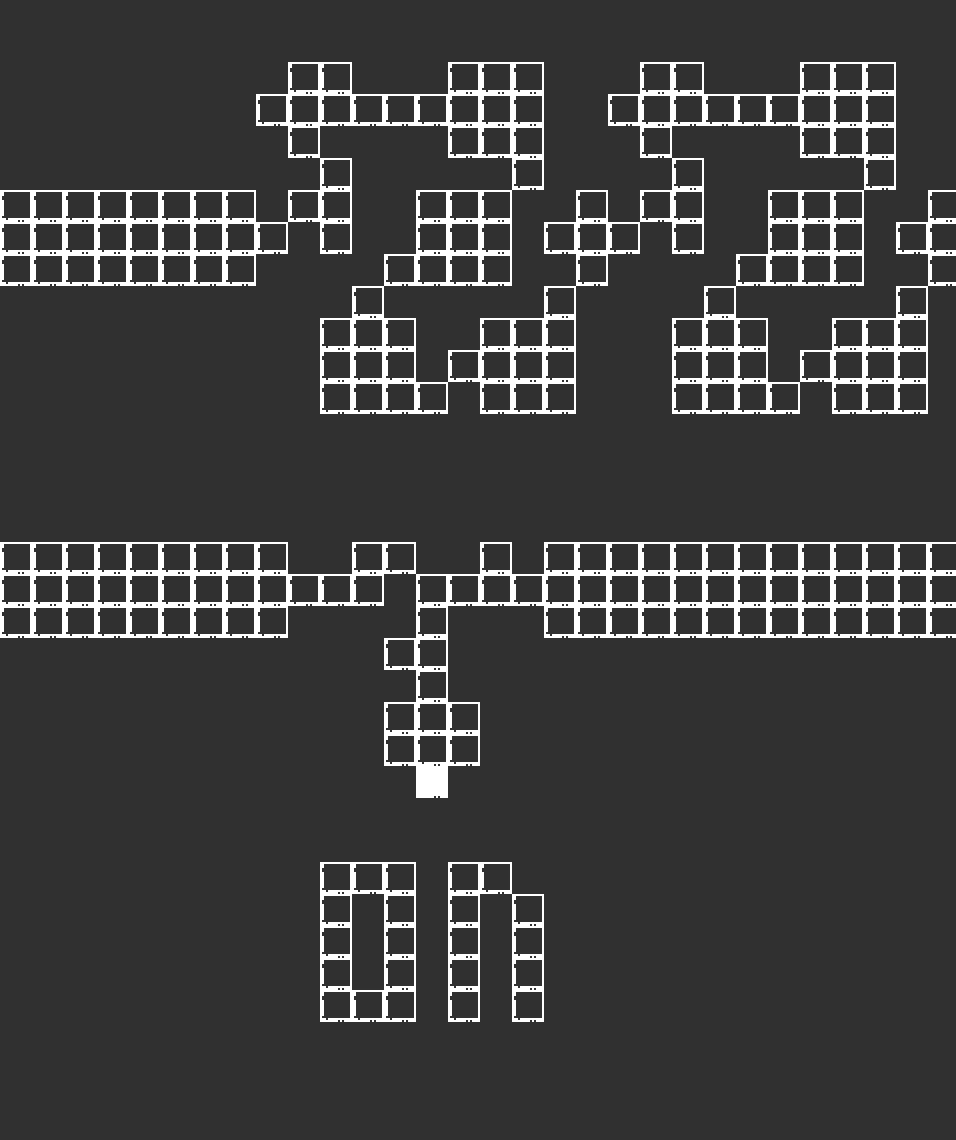
继续放大:
每个单元中存放着大量的信息,有这样的最小单元携带.
我们让这个自动机动起来:
宏观上看,并且加快速度,8^5速度下,这些单元携带着数据动了起来!
先来到ROM取指令
仔细看的话根据ROM中的结构,走的“路径”是不一样的,3*4这种结构不会“右拐”,另外一种像横着的“中”字的结构会“右转”.
不过像这样的CPU,其实是能找到一样的资料的(感觉OOO也不会专门写这么一个东西过来,应该是有完整的实现再改改).impakho师傅最终找到这篇文章:Build a working game of Tetris in Conway's Game of Life,这里详细的介绍了这个的实现过程.
同时还找到了这种汇编语言的解释器:QFTASM Interpreter.根据解释器和上面的文章,再加自己的调试,大概搞清楚了它在做什么.
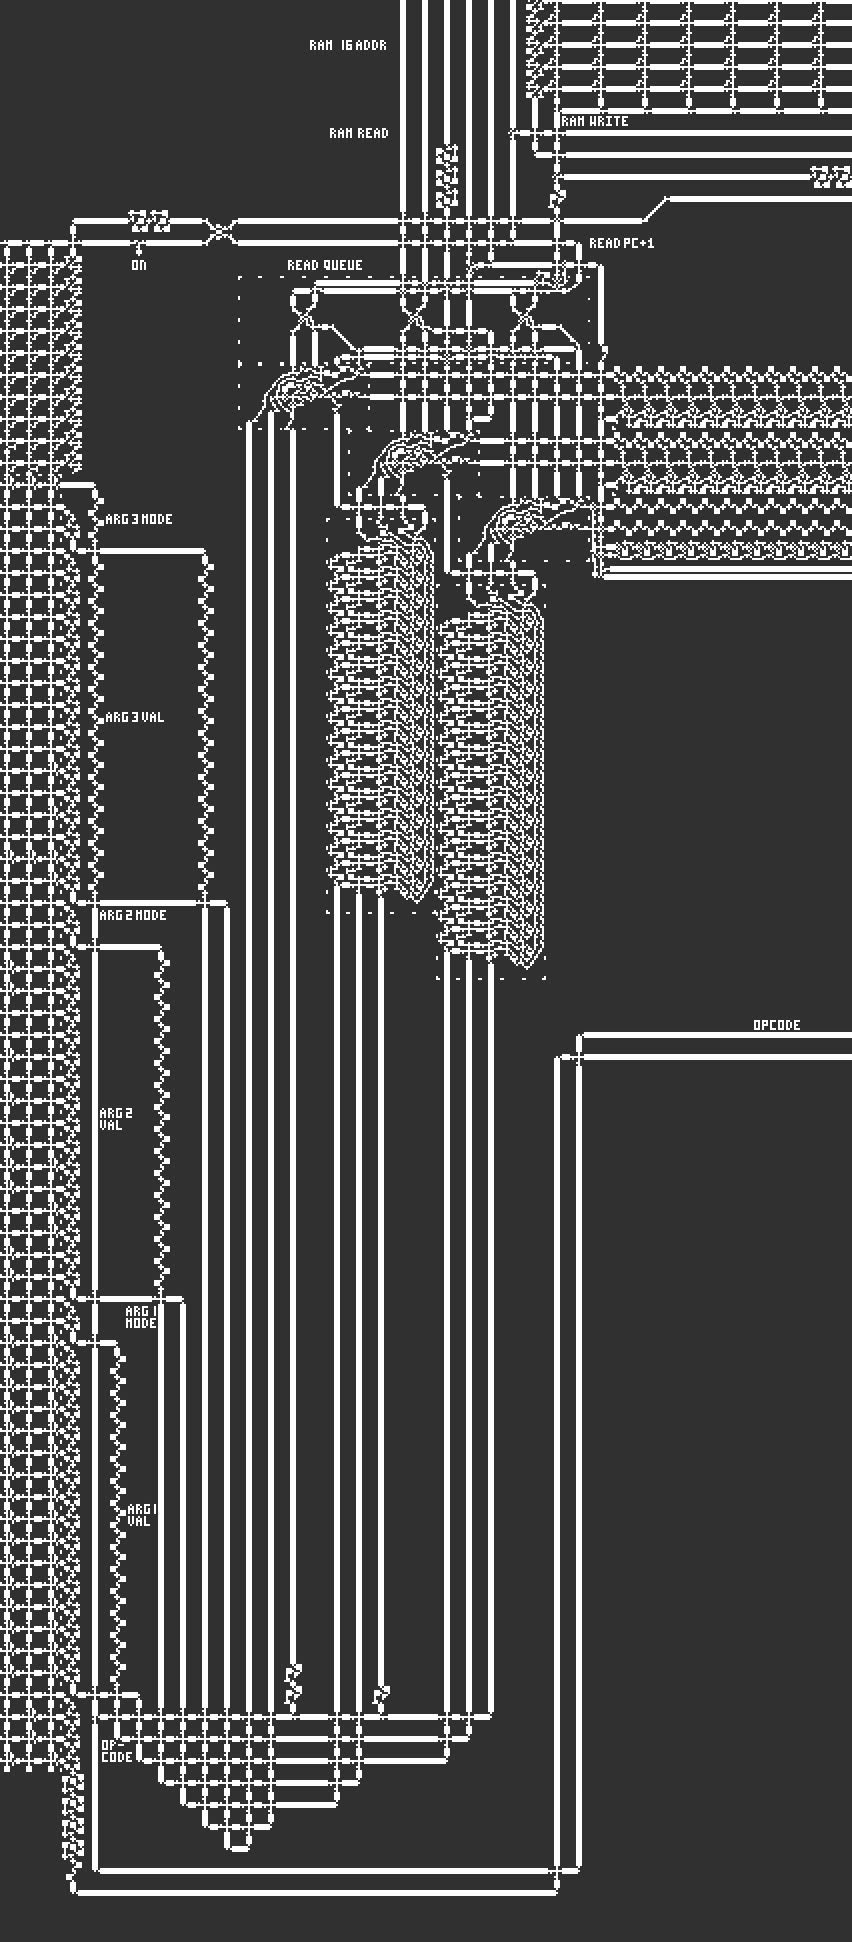
首先依次取出每一条指令,根据图中标记的结构解析出opcode, arg 1 val, arg 1 mode, arg 2 val, arg2 mode, arg3 val, arg 3 mode.取指令的时候,根据ROM中的结构区分0和1.以opcode这里为例:
这里就代表着0001,1号指令对应的是MLZ.在QFTASM Interpreter这篇文章里还介绍了整个架构.MLZ指令的意思是小于零则移动.
Documentation
QFTASM is a very simple version of Assembly developed for the Quest For Tetris project. To use this interpreter, put your code in the text box and click Set code to enable the flow control buttons. Run will execute the instructions as quickly as possible, Step will execute one instruction at a time, and Slow will execute instructions at a user-defined rate.
Each instruction should be formatted like this:
[number]: [INST] [arg1] [arg2] [arg3]. Optional comments are also allowed, and are denoted by a semicolon. Here is a list of instructions along with their arguments:
MNZ [test] [value] [dest]– Move if not zero; sets[dest]to[value]if[test]is not zero.MLZ [test] [value] [dest]– Move if less than zero; sets[dest]to[value]if[test]is less than zero.ADD [val1] [val2] [dest]– Add; adds[val1]to[val2]and stores the result in[dest].SUB [val1] [val2] [dest]– Subtract; subtracts[val2]from[val1]and stores the result in[dest].AND [val1] [val2] [dest]– Bitwise AND; bitwise ANDs together[val1]and[val2]and stores the result in[dest].OR [val1] [val2] [dest]– Bitwise OR; bitwise ORs together[val1]and[val2]and stores the result in[dest].XOR [val1] [val2] [dest]– Bitwise XOR; bitwise XORs together[val1]and[val2]and stores the result in[dest].ANT [val1] [val2] [dest]– Bitwise AND-NOT; bitwise ANDs together[val1]and (NOT[val2]) and stores the result in[dest].SL [val1] [val2] [dest]– Shift left; shifts[val1]left by[val2]bits and stores the result in[dest].SRL [val1] [val2] [dest]– Shift right (logical); shifts[val1]right by[val2]bits and stores the result in[dest]. Doesn't preserve sign.SRA [val1] [val2] [dest]– Shift right (arithmetic); shifts[val1]right by[val2]bits and stores the result in[dest], while preserving sign.There are two formats for arguments: literal integers and references. Integers may either positive or negative, with the negative ones converted to two's complement (for example, -37 becomes 65573), and they are limited to the range 0–65535 (16 bits). For references, the number of dereferences is notated by one of
A, B, C. For instance,A37will be replaced with the data in address 37 at execution time.B37will be replaced with the data in the address given by the data in address 37, and likewise, with one more level, forC37.The first table shows the instructions and their machine code equivalents. In the ASM column is the code exactly as it appears in the input, sans comment. In the Opcode column is the code for that command. Type refers to the reference level, so
37would have a type of00andA37would have a type of01. Finally, Location is just the value or address. Also, the highlights show the next two instructions to be executed.The second table shows the RAM bank, and I think the columns are pretty self-explanatory. More RAM slots are added as needed (when an instruction reads from or writes to an address outside of the current range).
The three text boxes directly below can be used to set breakpoints. Simply enter addresses separated by commas and/or spaces. Any of the following will work: '
1,2,3', '1, 2, 3', '1 2 3'.Regarding the direct write to RAM line, that address will be set to that value when that address is read. Once that address is set, then the value box is blanked. Further reads of the same address will not do anything if the value box is blank. The accompanying checkbox is self-explanatory, with the caveat that if a value is entered and then the user resumes the interpreter, that address will be set to that value the next time it is read.
For specifying which addresses to display, the format should be something like
0 2-4 6. Ranges of numbers are denoted bya-b(inclusive), with no spaces on either side of the dash. Separate numbers and ranges by commas and/or spaces.
为验证我们的猜想,不一会我们便能在ALU附近看到一颗元胞(我不知道该怎么称呼这样的单元,电子吗?)来到了MLZ处(gif比较快,注意观察MLZ左侧的几个像素):
根据文档,RAM的0地址是PC,执行一条指令后会加一,我们观察RAM的0地址,不一会便会发现写1的操作:
图中从左往右的是读,从下往上的是写.可以看到最上方的bit被写为了1.
第一条指令MLZ -1 44 43的意思是将立即数44写进43地址,我们观察43地址,确实存放0x2C:
当然,让GOLLY直接Generate的确能跑完整个程序,但是太慢了,而且查看内存也极其不方便.
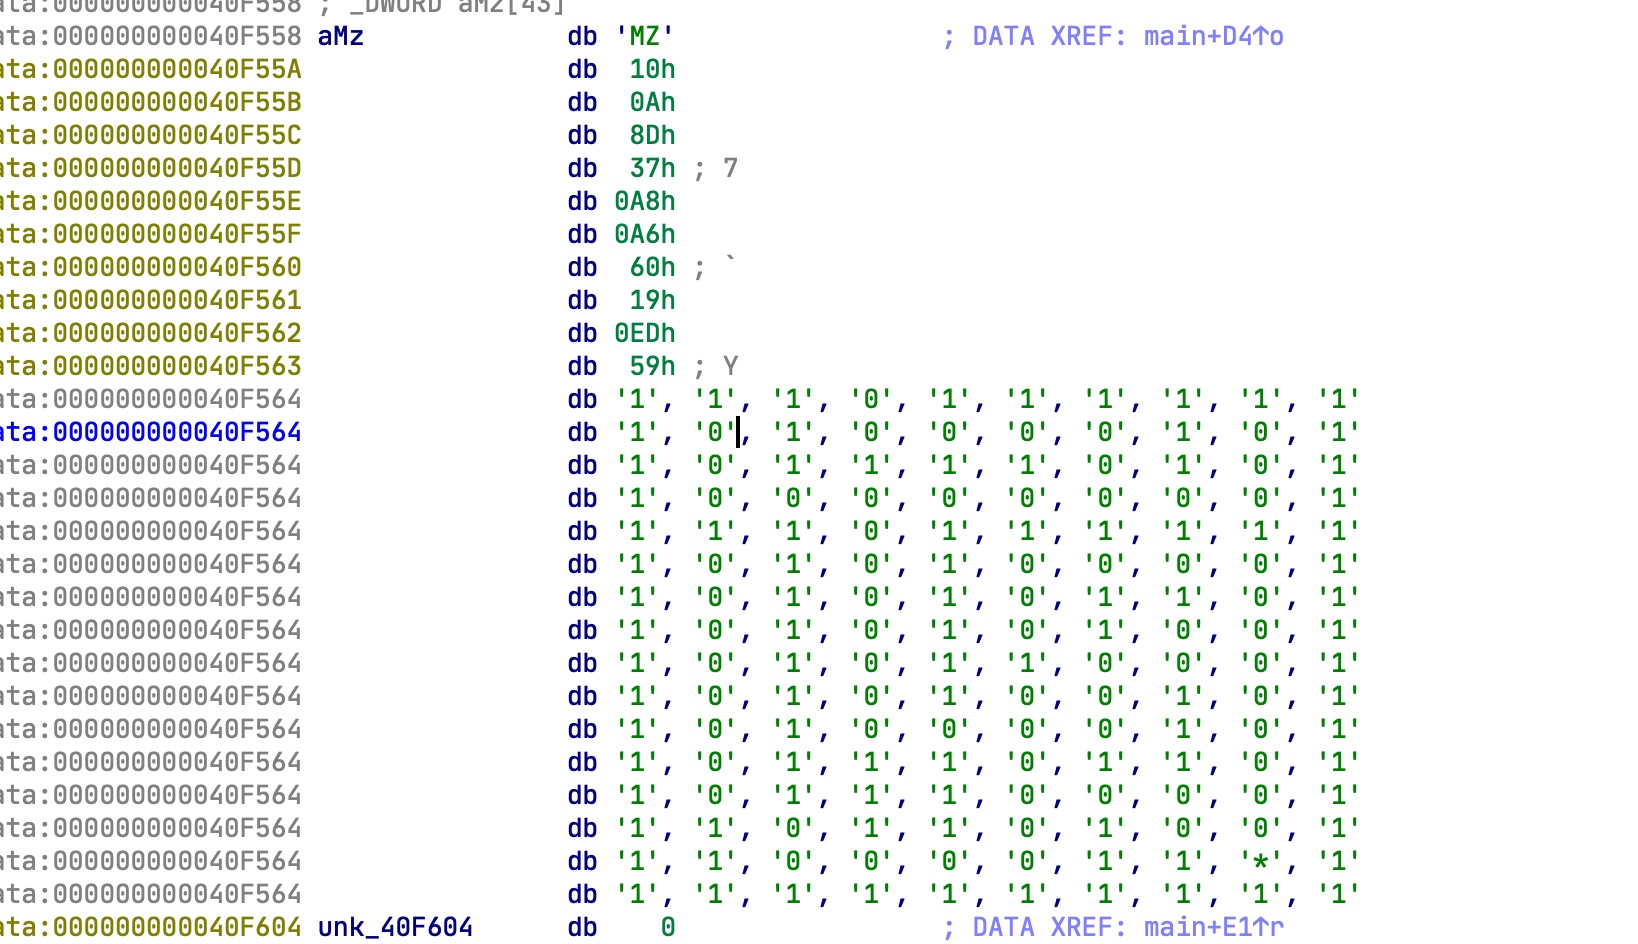
观察一下ROM部分,由于0/1的差别比较大,可以截图下来对图像处理,写个脚本提取出ROM:
提取ROM并求解
下方密恐慎入.
我们对一些特定的像素点进行识别,提取出01数据.再按照文档解析成指令,同时可以写个简单的解释器解释执行:

⚠️:此脚本只对本图有效
1 | from PIL import Image, ImageDraw |
1 | 0. MLZ -1 44 43 |
整个代码非常简单,只是在做一些异或和减法运算.
丢进在线的解释器可以调试,经过一通调试,发现RAM中的结果有些不同.
最后发现RAM1地址是有东西的,这里好坑.
最终得到的结果并不是flag.似乎整个程序也是在做固定的工作,每次运行的结果都一样,那么要怎么得到flag呢?
回过头来看一下题目描述:
By discovering its secrets, you will restart the game of life with a chance to do it all over again.
找到什么secrets,再运行一遍就得到flag了.结合RAM1地址是有东西的,如果我们对他进行一些修改,计算出的结果也是不一样的.是否这个数据就是所谓的secrets.在上面的脚本基础上修改一下,爆破1地址的内容:
1 | from PIL import Image, ImageDraw |
最终在61463的地方发现了flag:
1 | 61463 |
BabyMaze & MamaMaze
The flag is on the wings of the flying plane. It is possible to get the flag without instrumenting or modifying the binary. Tested on Ubuntu 16.04, Ubuntu 18.04, and Ubuntu 20.04. You should use a system able to run the game at approximately 60 fps. It requires: sudo apt-get install freeglut3
- babymaze.challenges.ooo 7777
Files:
- BabyMaze 4d7aabfb62d46ea98379254a62023f178c1922c0908f3ff19634ca8c22f97cef
MamaMaze和BabyMaze没太大区别,只是第二张地图改的更大了.我这里的做法都一样.
迷宫游戏
按照题目描述,这是个迷宫挑战,需要freeglut.看到这个我就回想起了上学期的计算机图形学以及OpenGL...
运行一下是个3D的迷宫游戏,应该是用OpenGL实现的:
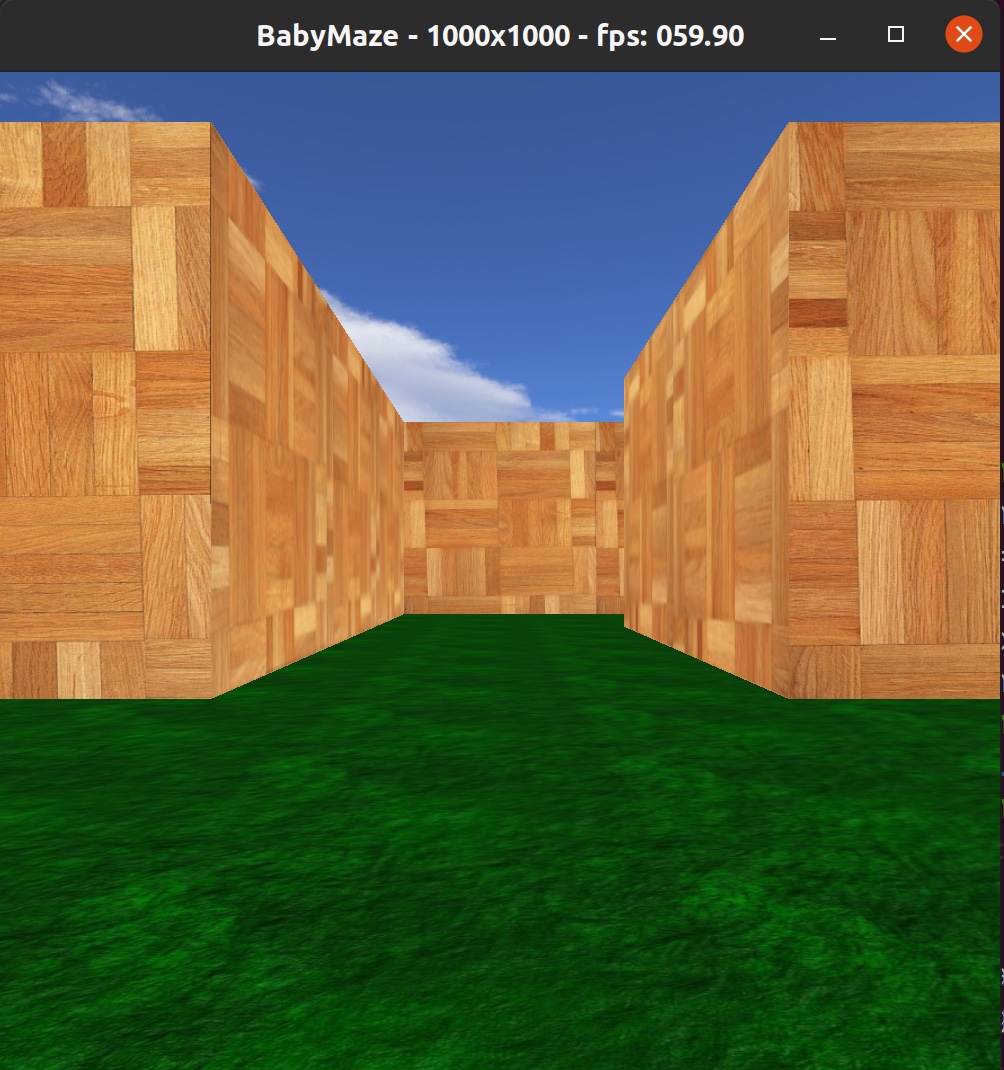
运行的时候命令行参数要附带题目中的IP和PORT
摸索一下操作,WASD移动,R重置,Q退出,ZX左右旋转视角.鼠标也能切换事业,但是可能代码有问题,不是正常的第一人称视角那种切换,而是根据鼠标位置上下左右移动,操作极其反人类...
Connecting to babymaze.challenges.ooo 7777... Connected! Solving POW... done!
Hello! Welcome to BabyMaze Press Q to quit
First of all, you have to find the computer!
根据命令行的提示,先要找到一个computer
玩一下很快就能找到第一个目标(这条路我闭着眼睛都快能走了,谁能想象这两天我调试了多少次...
到达后:
Good job, you found the computer! Now select your next maze (use your keyboard)
键盘选择下一个地图,只有1和2可用.我测试一直用的1
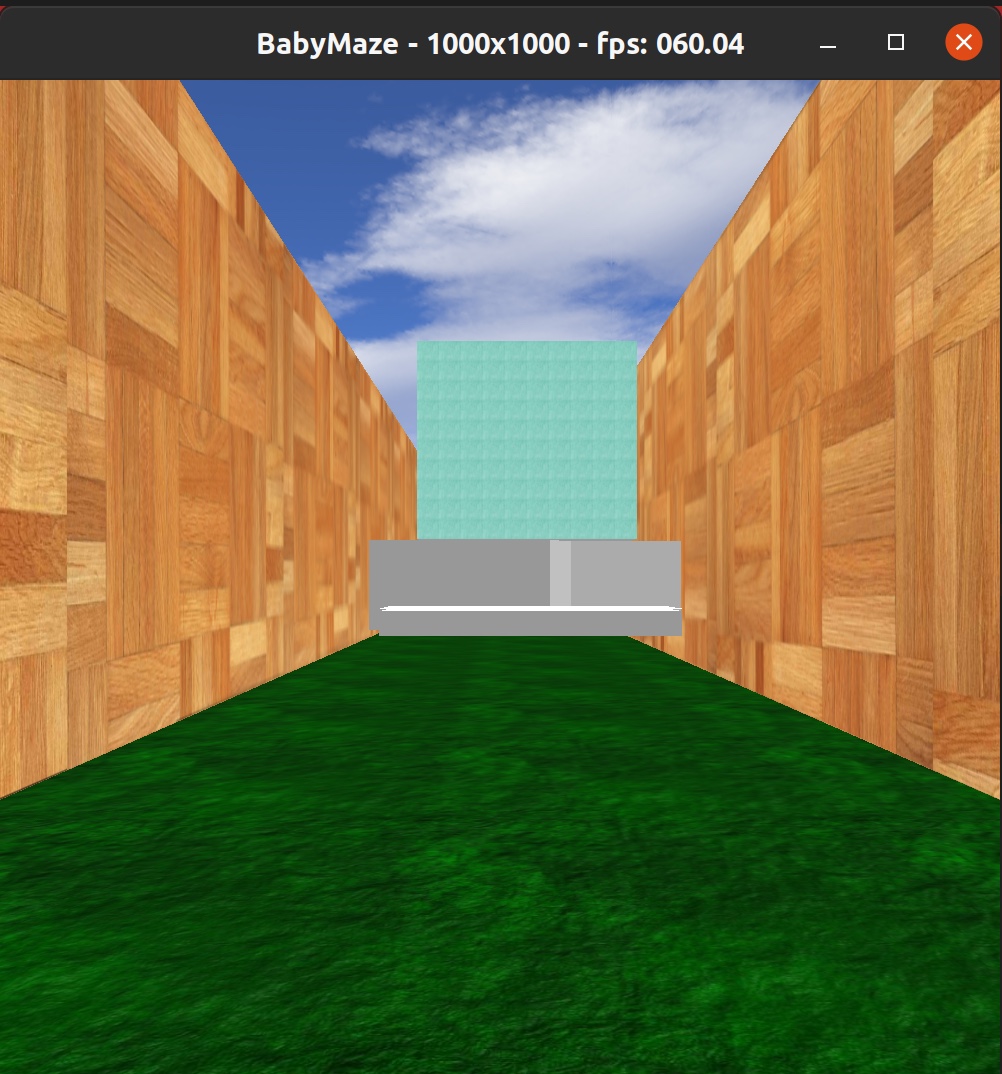
1 Now find the yellow box, you have 8 seconds! Too Slow!
需要在8秒之内找到yellow box,这是这道题的核心,也是卡了我一天的地方...
摸清功能,接下来开始逆向
主程序分析
fork 主进程
fork之后,主进程校验环境变量,不能有LD_开头.
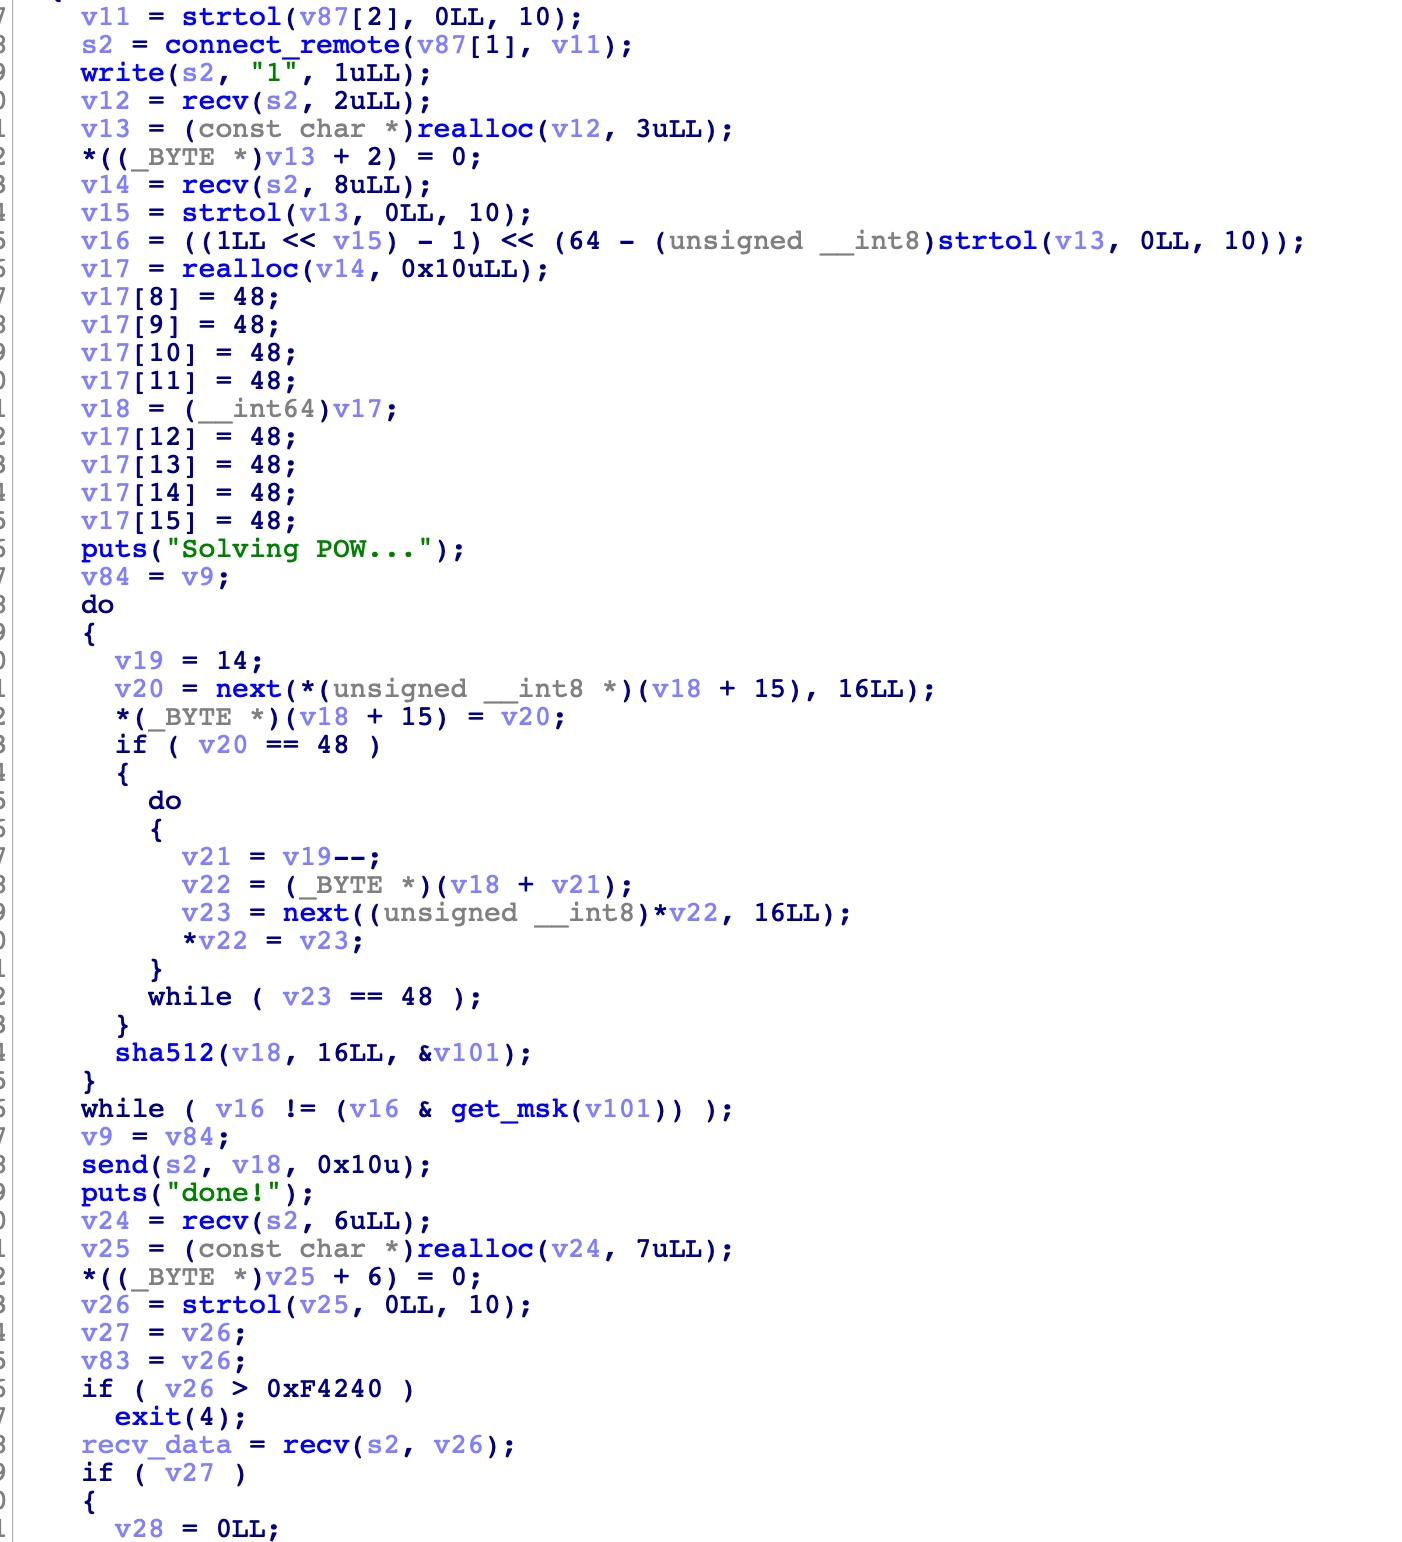
之后连接远程服务器,发送1,经过POW后,服务器会回一些数据和checksum.
接下来通过ptrace调试子进程,只接受int 3断点(wstatus的高8bit的值为5)
根据触发断点的次数,有不同的行为,一共捕获6次断点.
fork 子进程
fork之后,子进程读取文件中第二个ELF头,解密elf,新建memfd后拷贝过去,然后execv运行该elf,同时命令行参数为主进程的一个地址93824994345264(为了方便调试,我把ALSR关闭了,每次这个地址相同).这个地址初始存的是0.
运行后可以把/proc/pid/exe拷贝出来,获取子进程执行的elf.
游戏进程是实际进行迷宫游戏的部分,具体是用OpenGL实现的,如果写过OpenGL的话会对这里比较熟悉.
可以直接调试这个elf,注意要正确的传递参数.全局搜int 3可以找到断点在哪里.也可以调试起来触发trap信号.
整体的思路其实比较简单,找到8秒限制的位置,想办法破除.但实际上操作起来比较麻烦,需要找到合适方法.
先理一边游戏流程,找到合适突破口,我们可以调试主进程+调试游戏进程,来搞清楚整个程序在做什么.
breakpoint1
先调试主进程,在wait后下断,查看每一次断点的捕获:
第一次断下来后,使用PRACE_PEEKDATA,对0x401000-0x413000的地方做循环异或,校验此处的结果,存进check_sum1.check_sum1在后面用到.显然这里是阻止我们patch游戏进程.
然后从0x401000开始遍历,找到第一个全是nop的地方,我们通过调试可以拿到这个地址是405DEE,然后把这里开始的0xd0个数据patch成之前服务器发送的数据.

所以第一个断点作用是校验子进程401000-413000的完整性,并修改代码.
breakpoint2
继续调试,触发第二个breakpoint.
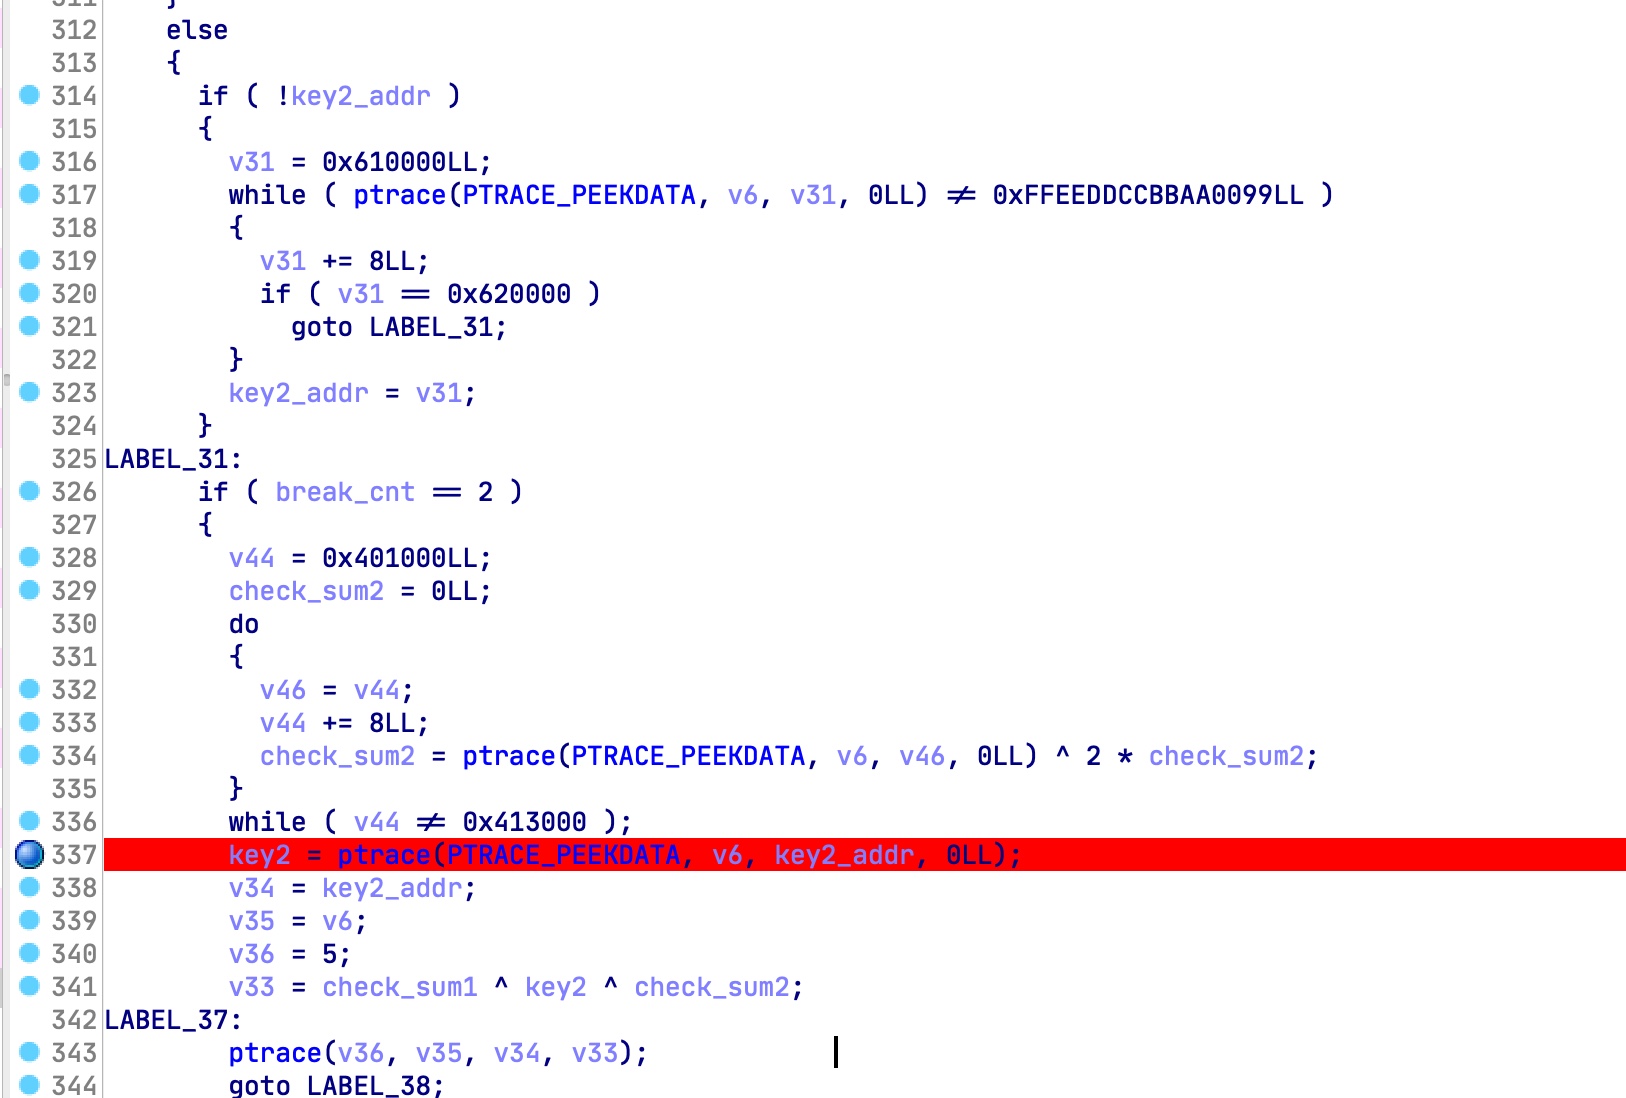
先从0x610000开始搜索0xFFEEDDCCBBAA0099,搜到的地址存下来做key2_addr.经过调试/静态搜索不难发现是613498.613490这个地址开始的16个字节的数据非常关键,是一个解密密钥.整个程序都在围绕这个解密密钥进行.初始化为11223344556677889900aabbccddeeff.

然后这里又一次对401000-413000的数据进行校验.注意此时一部分代码已被修改,校验的是修改完的代码.然后将key的后8字节修改成checksum1 ^ checksum2 ^ key2.
breakpoint3 && breakpoint4
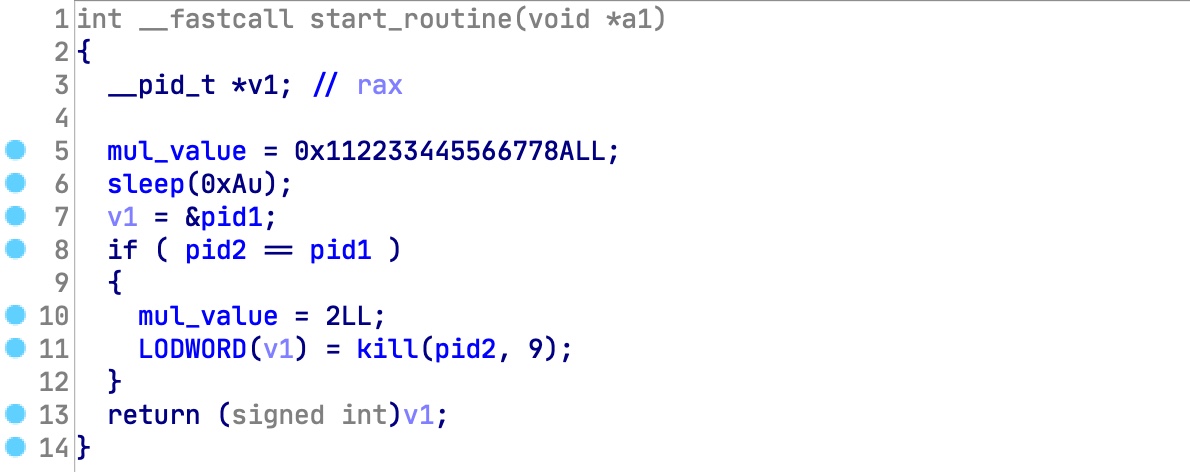
触发第三个断点时,创建一个线程执行线程函数:

线程函数:
这里修改一个变量,然后sleep10秒,然后判定pid1 和 pid2是否相等(在检验完环境变量后会将这两个变量都赋值为子进程pid),相等会kill掉子进程
对pid2查找引用,在第四个断点用到:
第四次触发断点时,会将pid2改为-1.也就是说,我们必须要在10秒内触发第4个断点,不然直接kill.这里是一处时间校验.

breakpoint5
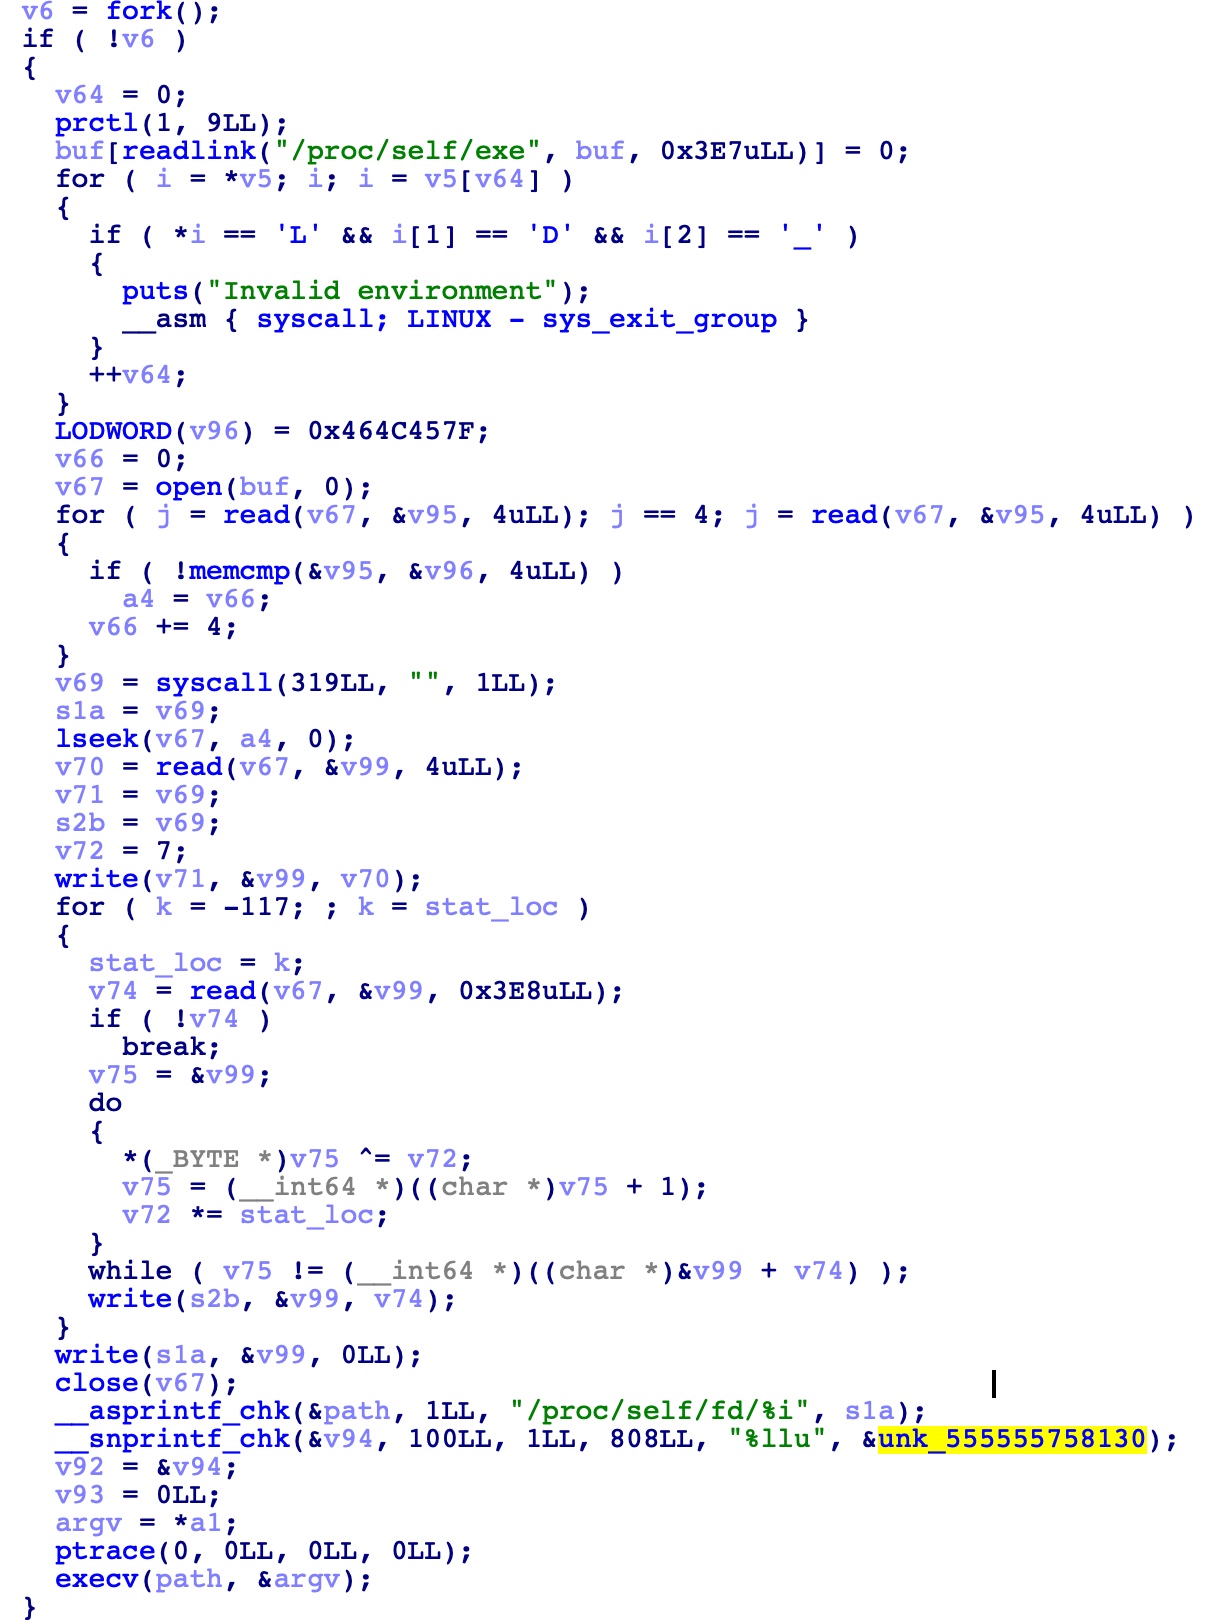
第五个断点,先对main开始的数据做校验.结束的条件是指针的内容和unk_555555758130一样.而这里开始存的内容是0x1111111122222222.代码段中并没有0x1111111122222222的数据,光看这里指针p指向的内容永远不会为0x1111111122222222,最终跑到当前Segment以外,然后触发异常gg.
当然程序能够正常运行,所以还有其他的操作,我们后面再看(如果对unk_555555758130查找引用,会发现子进程的命令行参数刚好是这个地址,所以可以猜想在子进程里对这个数据做了一些事情)

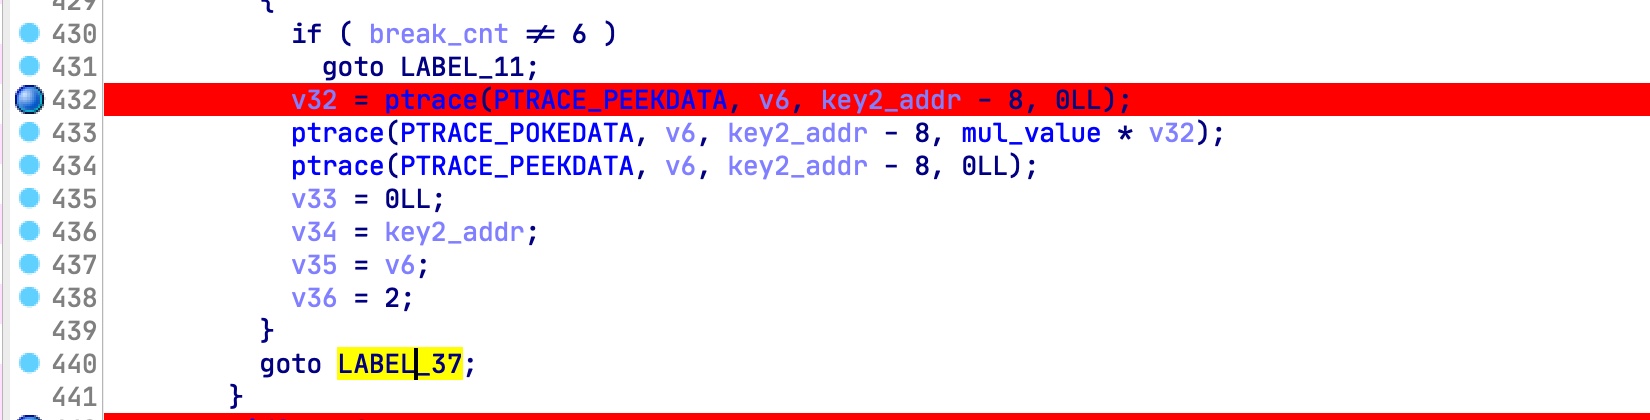
校验完主进程的数据后,又一次连接远程服务器,发送2,然后POW,然后peak子进程中的16字节的key,发送给服务器,服务器会16个字节,在poke道子进程上.(注意这里goto LABEL_37后还有ptrace,所以16个字节都写进去了)
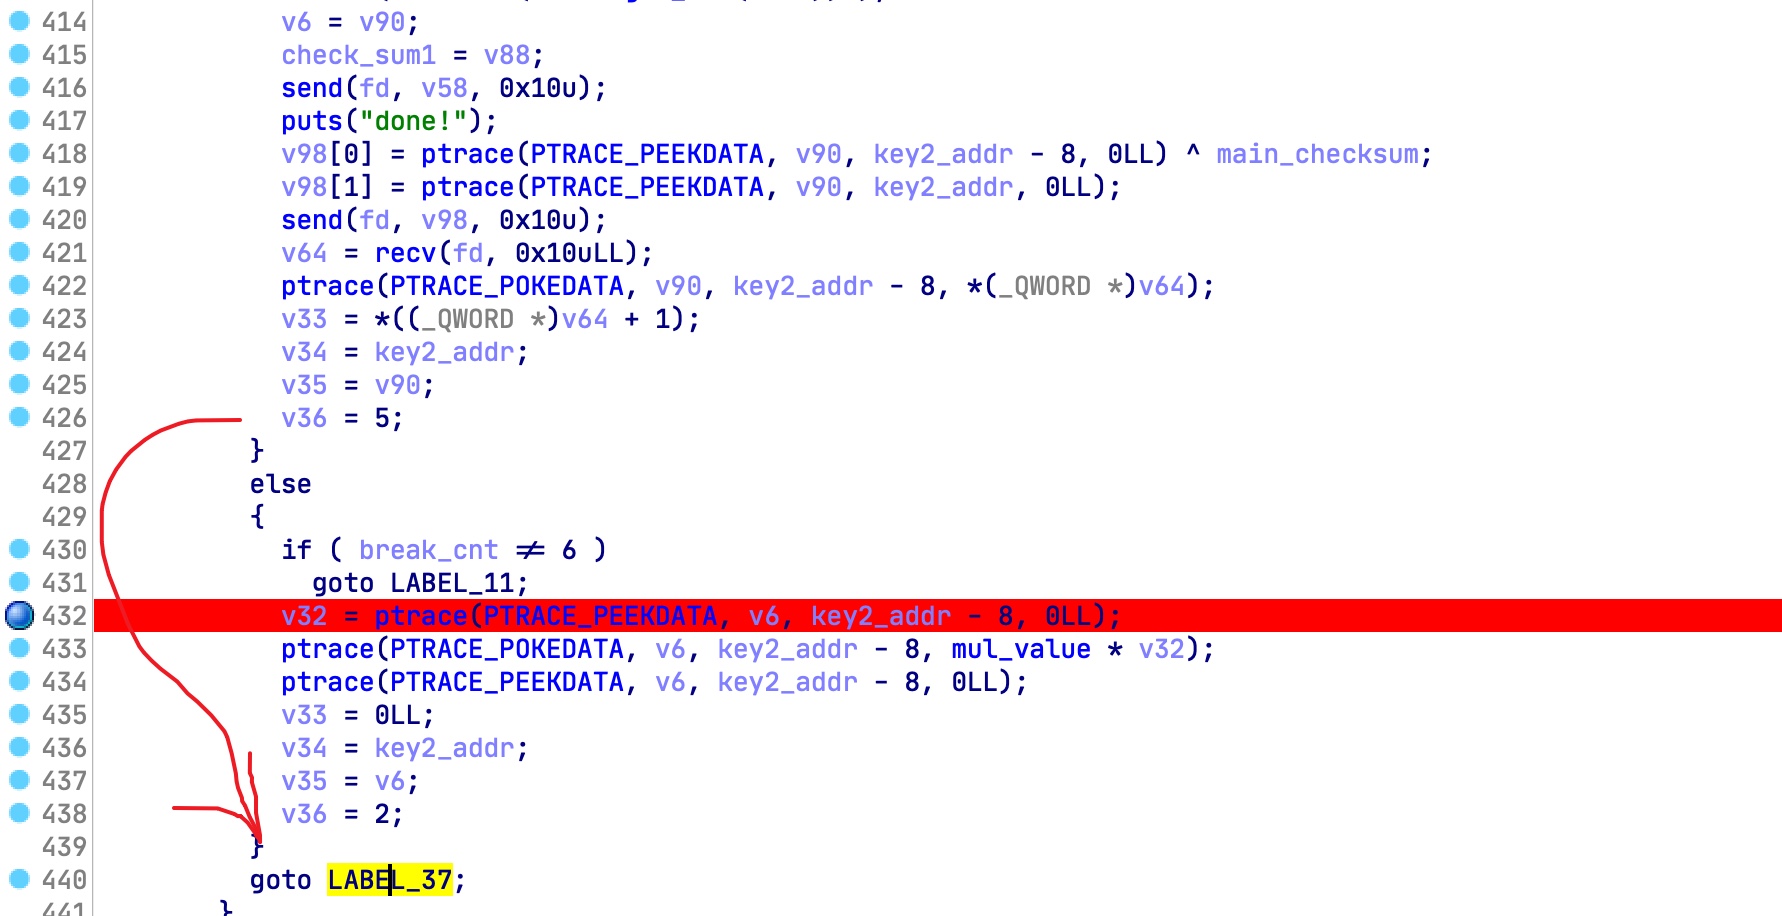
breakpoint6
第6次断点,获取key的前8字节,乘以mul_value后写回去,然后后面又peek key中的16字节,只是peek并没有poke.
迷宫程序分析
dump下来exe后,可以分析迷宫程序了.
可以结合调试分析.注意breakpoint1中修改了游戏进程的代码,所以运行到第一个breakpoint时要手动修改(或者提前patch好)
如果熟悉OpenGL的话,再逆向可能会轻松一点,实际影响不太大.整个程序比较大,有些细节没有逆完,一边逆一边遇到问题一边总结.
整个都逆下来显然工作量太大了,我们只能调重点的地方逆
freeglut使用glutKeyboardFunc函数设置键盘回调函数,可以看到按下不同按键的操作,只是将按键暂存起来.同时发现还有几个按键,h,
p, f,
v.可以进入游戏看看这些的功能,f和v暂时用不到,h是记录历史,p是查看历史.
glutIdleFunc设置Idle函数.具体的细节忘了,大概是每绘制一帧的时候都会调用它.Idle函数中的
sub_406380函数是主体部分,内容非常多,包含了大部分游戏逻辑的内容.
这里判定坐标是否到了computer的位置,computer坐标为(-45, 85)
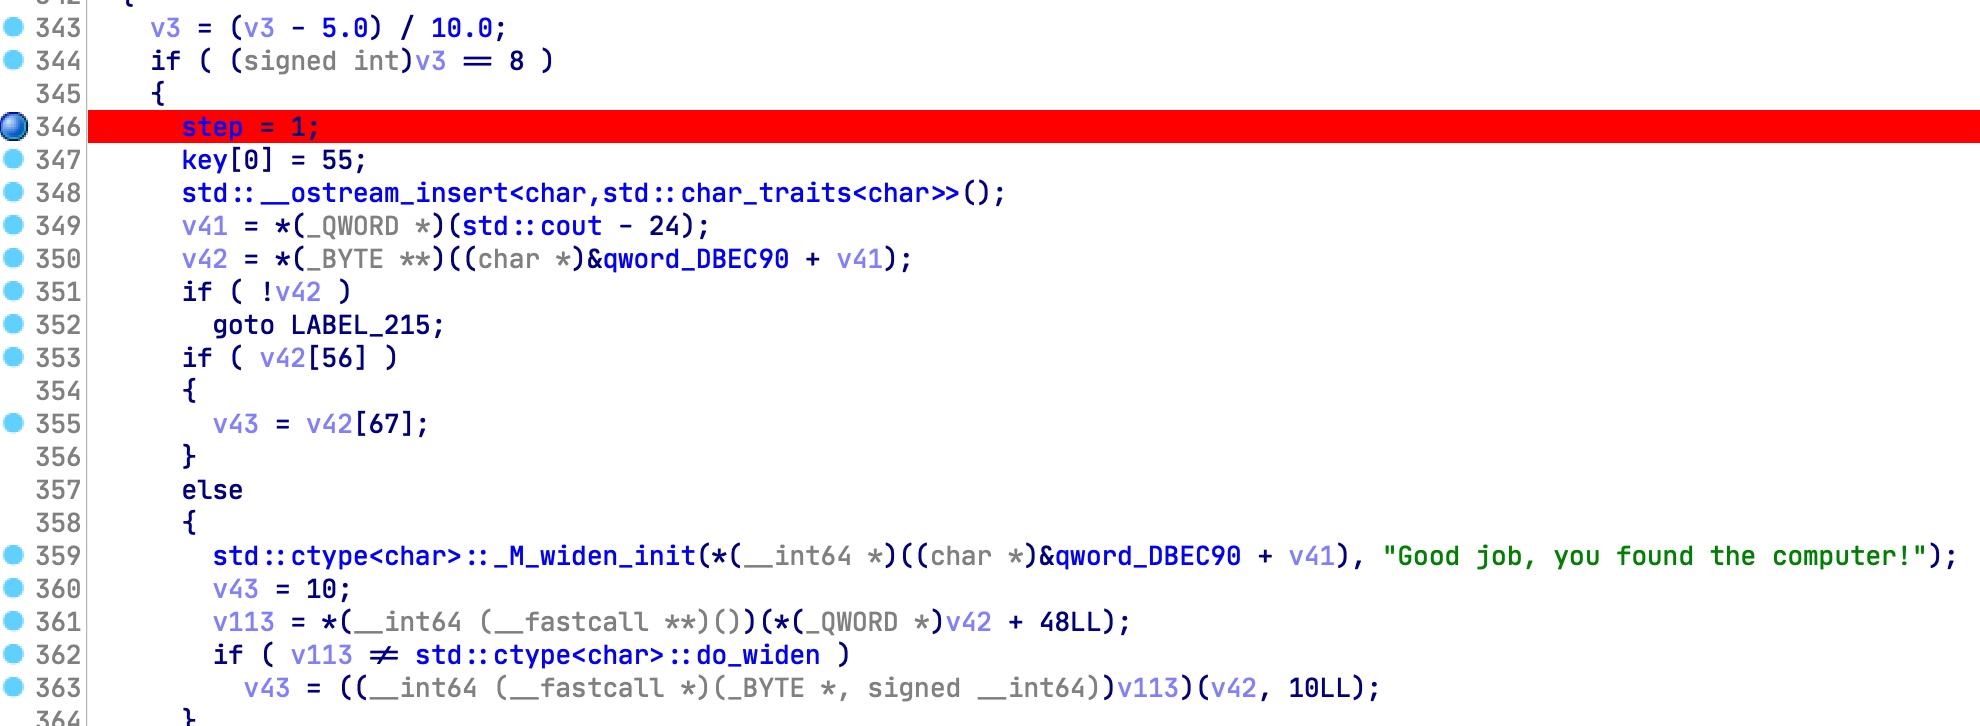
找到后,游戏提示选择地图.测试中只有1和2可以选.我一直选的是1.
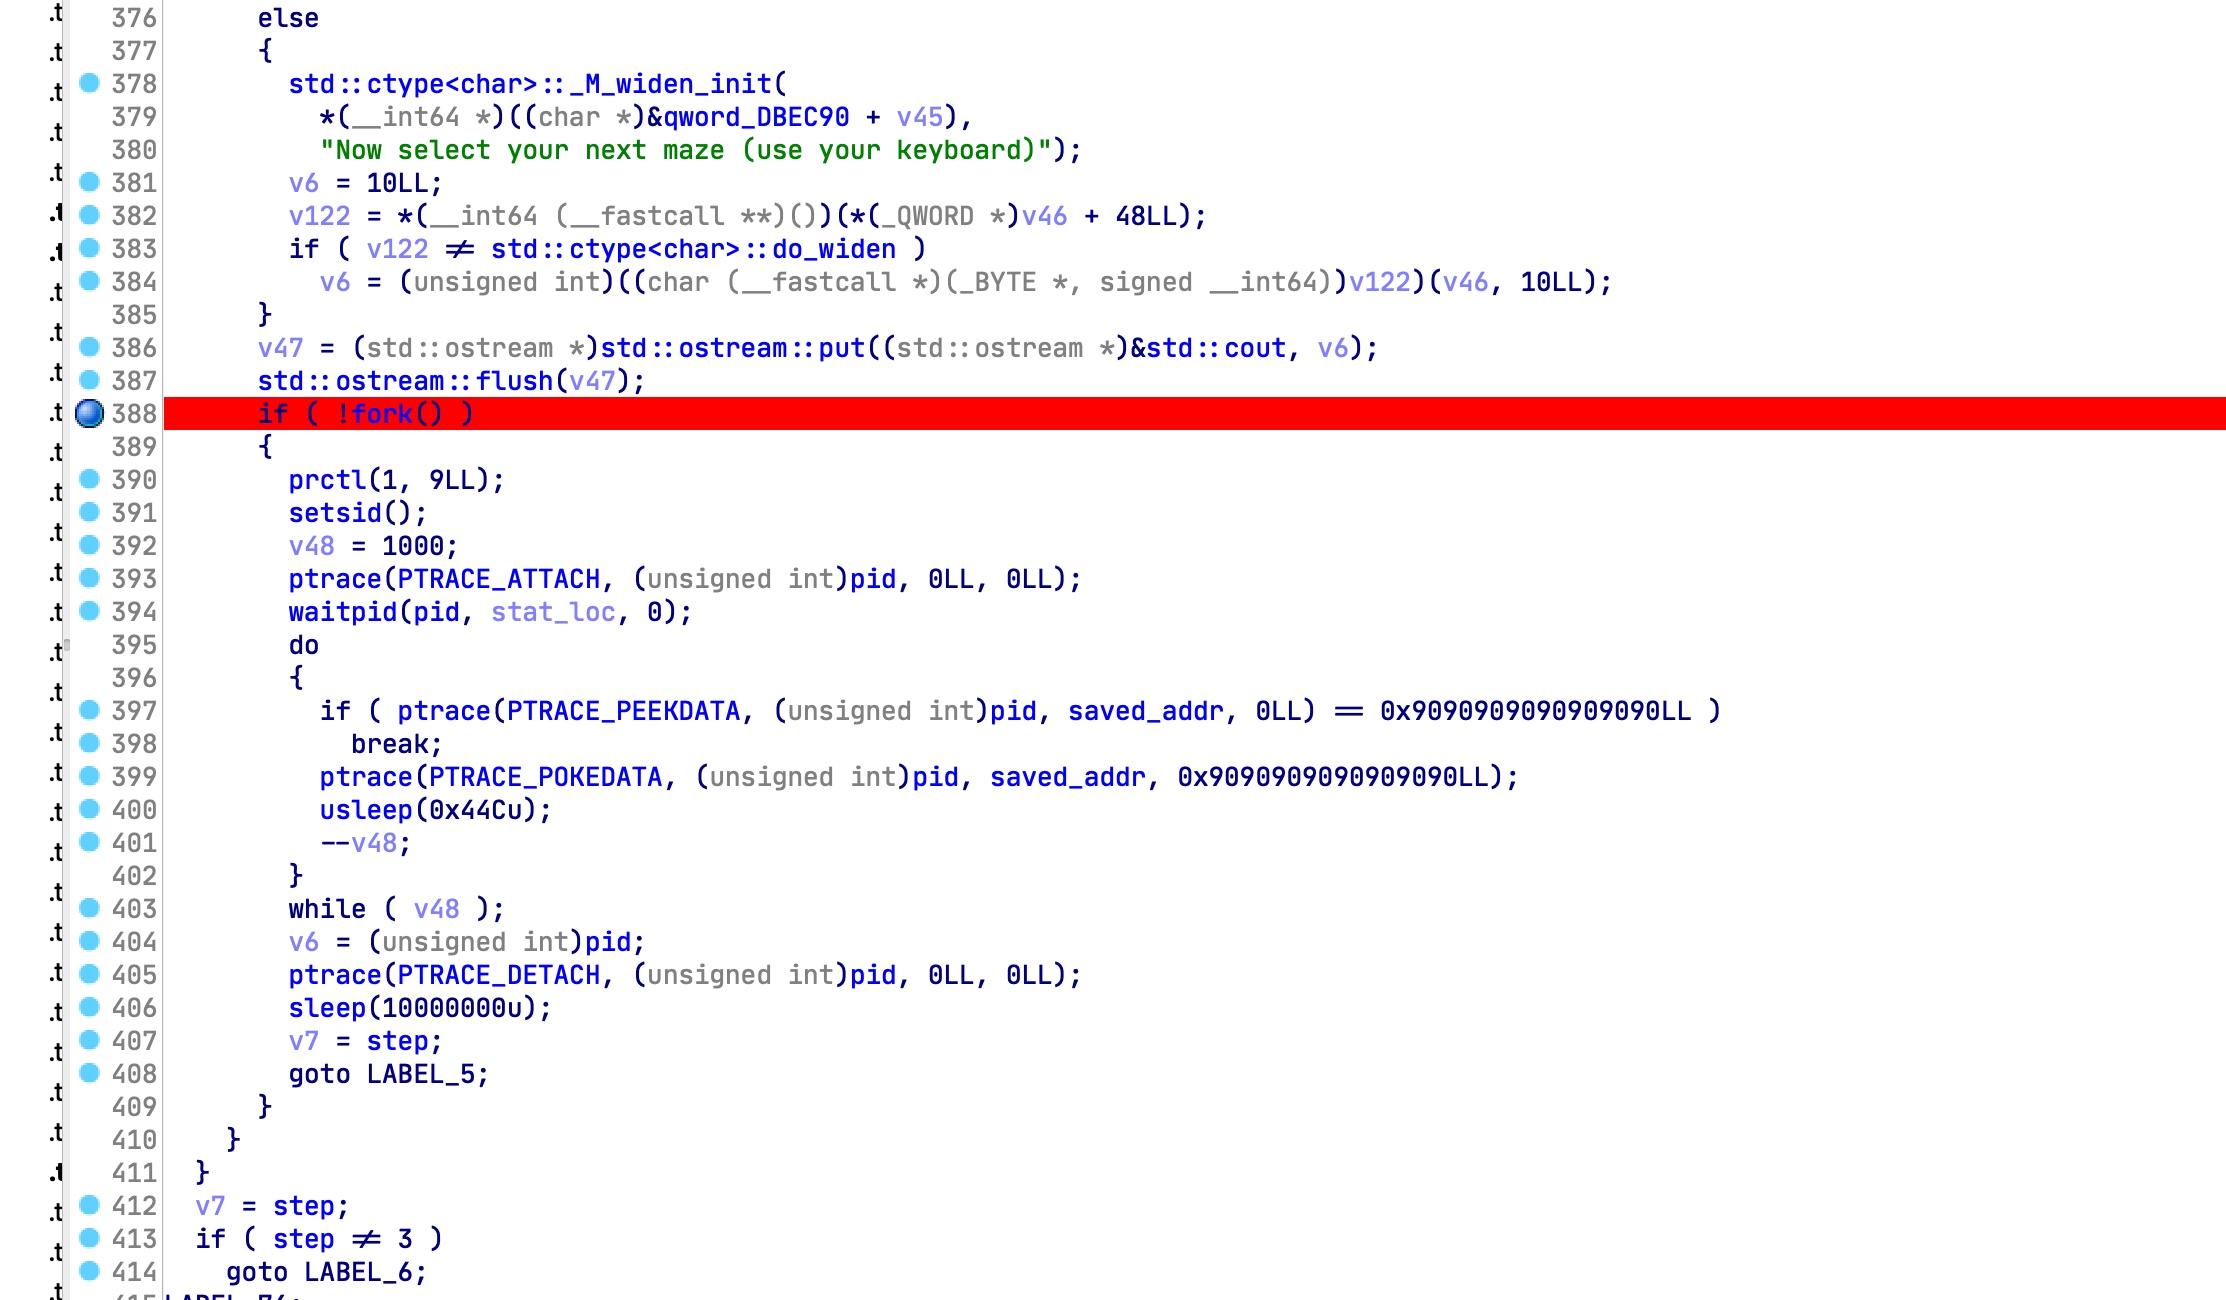
选完1后,又fork了一个子进程,去attach主进程(pid在最开头通过getppid获得),peek的地址是命令行参数传过来的地址,把它修改为0x9090909090909090结合上文breakpoint5中的动作,也就解释了为什么之前在breakpoint5校验main时那个不会无限往后校验.这里将变量修改为9090909090909090后,主进程check main函数时遇到9090909090909090会停下来.在main下面看一看,果然找到了一大片nop.也就是说,这里实际校验的是这一部分的内容.
我们运行起来,走到computer后,ps查看一下进程也能发现它的子进程:

由于一个进程只能有一个Tracer,所以我们调试主进程的话,子进程就不能对这里修改了.所以我们在调试的时候要手动修改.
继续往下,到字符串Too slow附近可以看到另一处时间校验:
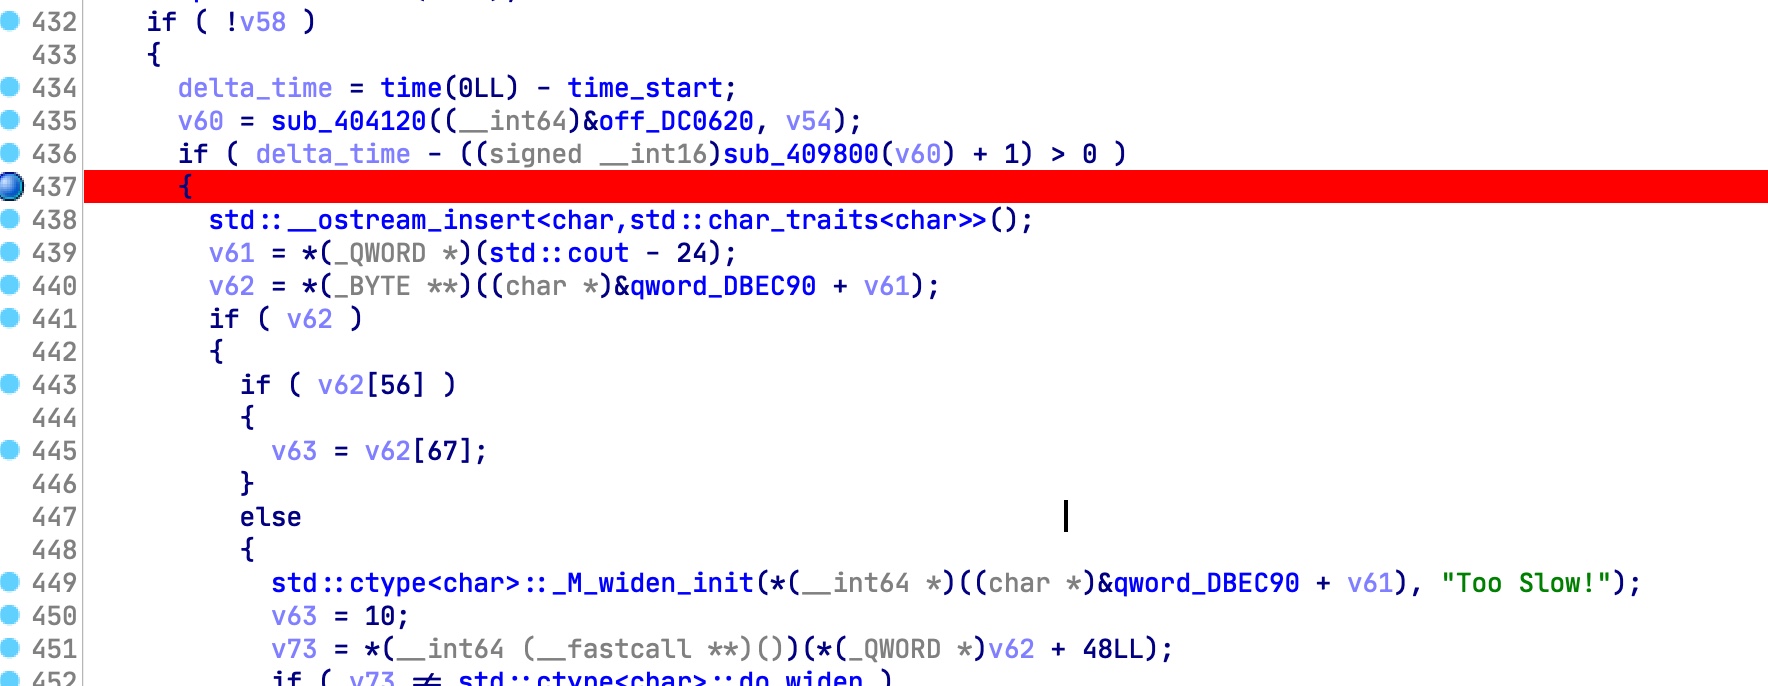
这里的time_start在按下数字1后记录.
校验迷宫的逻辑:
map位于bss段,在main开头被从rdata段拷贝过来.经过改过的sha256和aes后和签名校验.

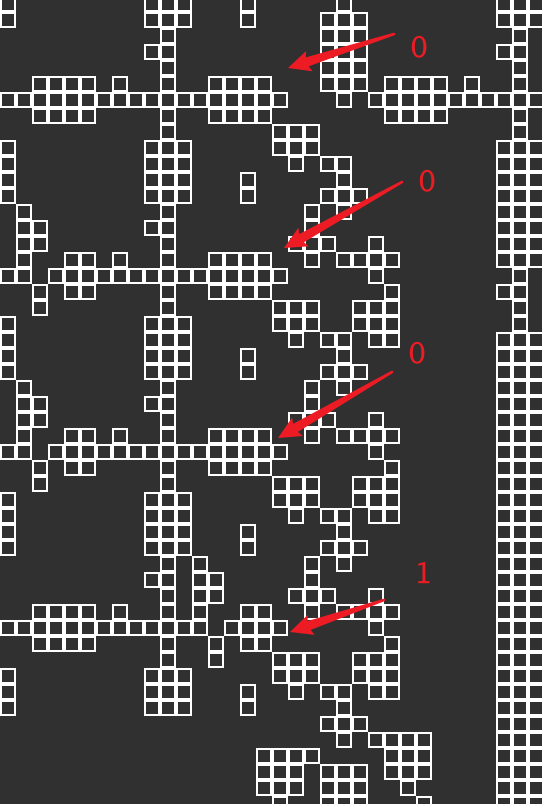
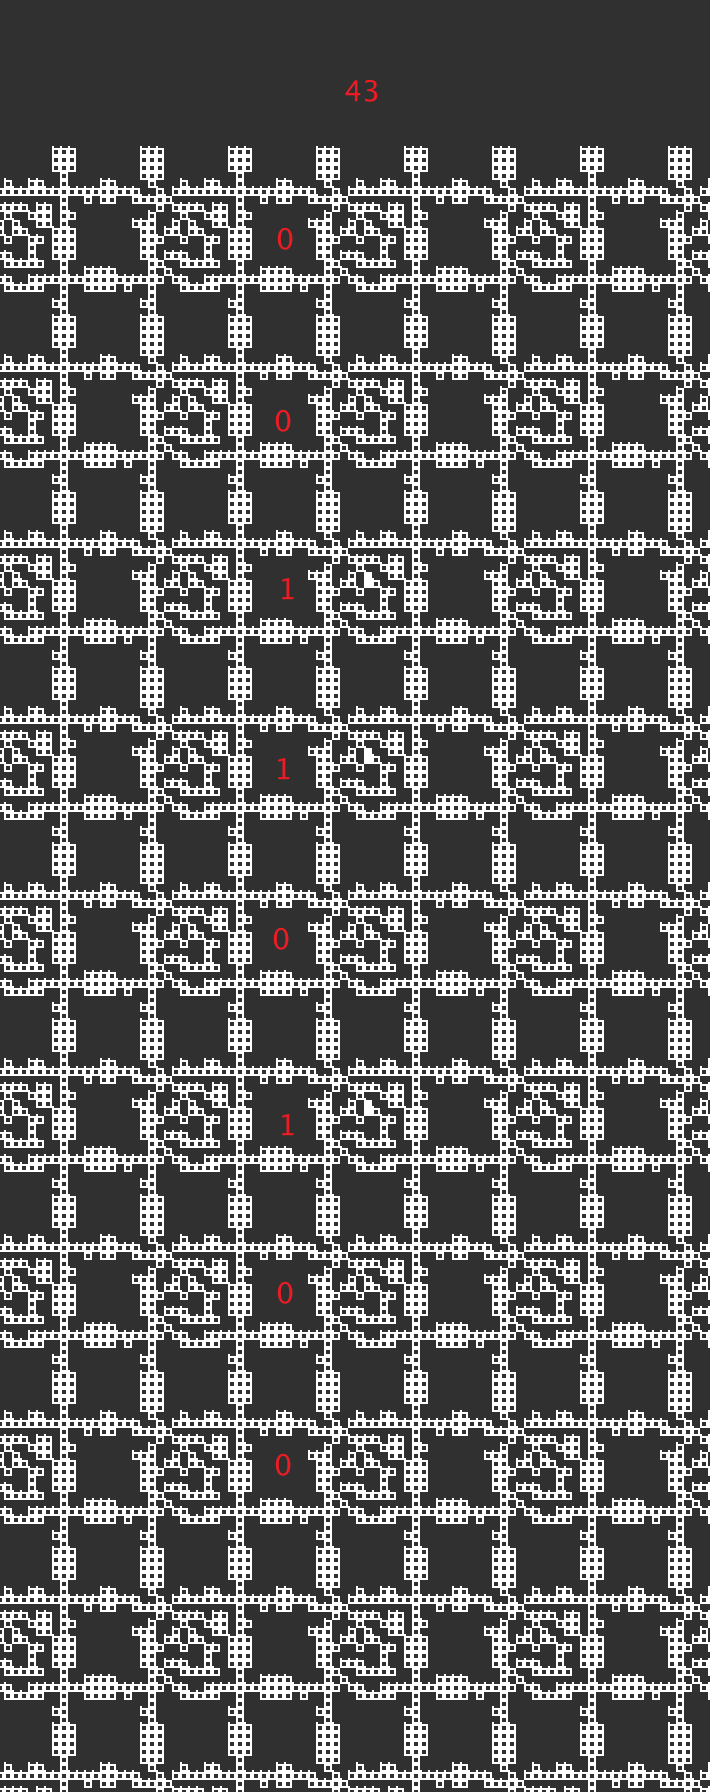
观察迷宫数据,不难猜出1是墙,0是走道儿:
如果成功抵达yellow box,就可以飞了.使用fvzx更改视野,提示flag在飞机翅膀上.
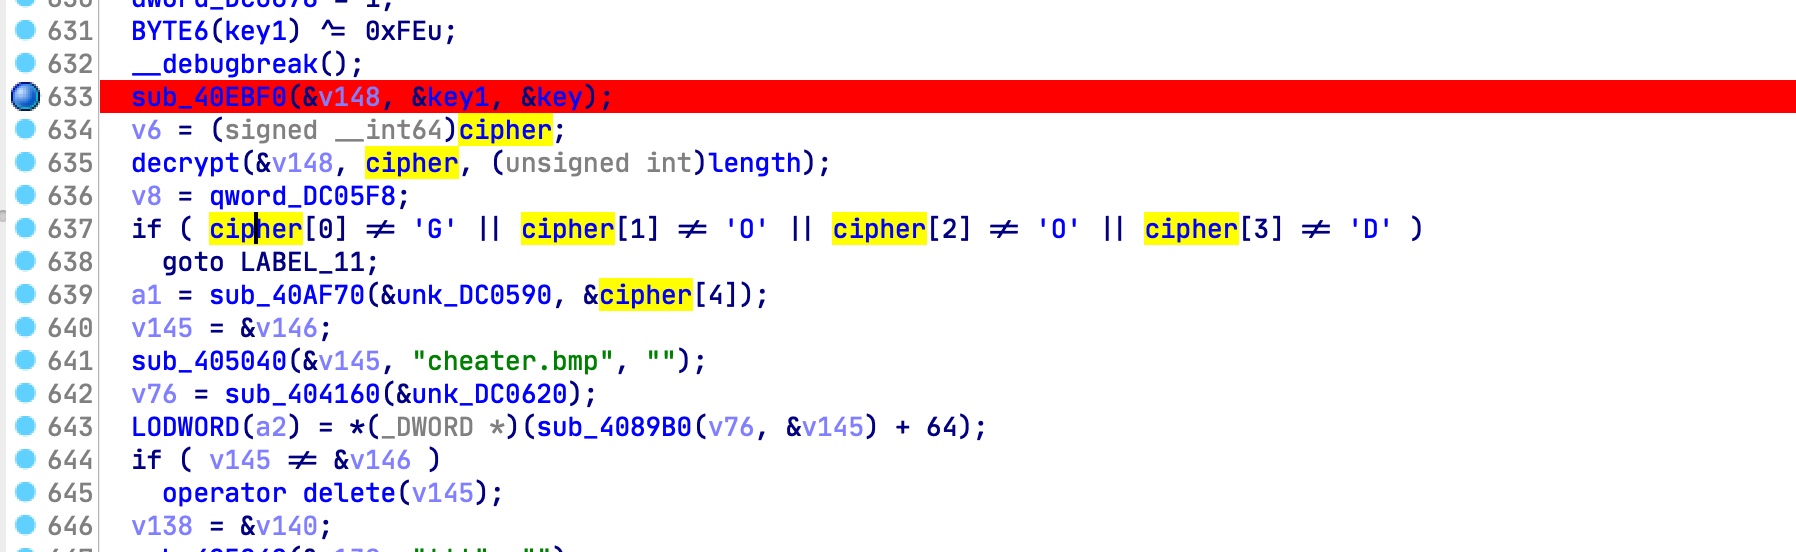
从选择迷宫开始,到飞到天上一定高度会触发几次断点,最后一次触发断点后会用之前提到的key解密一段密文,如果开头四个字符为GOOD的话说明解密正确,剩下部分会是真正flag的图片,否则显示的是一个cheater!的图片.
对key查找引用我们会发现有一大堆位置都在修改key:
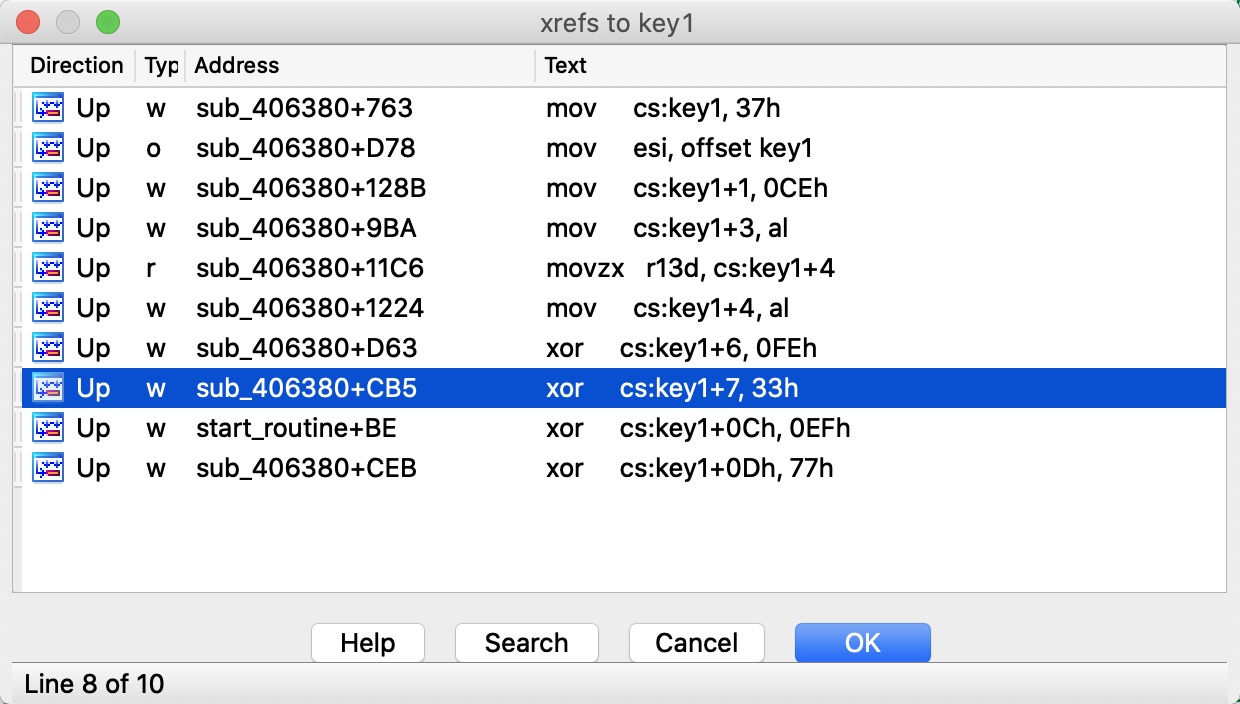
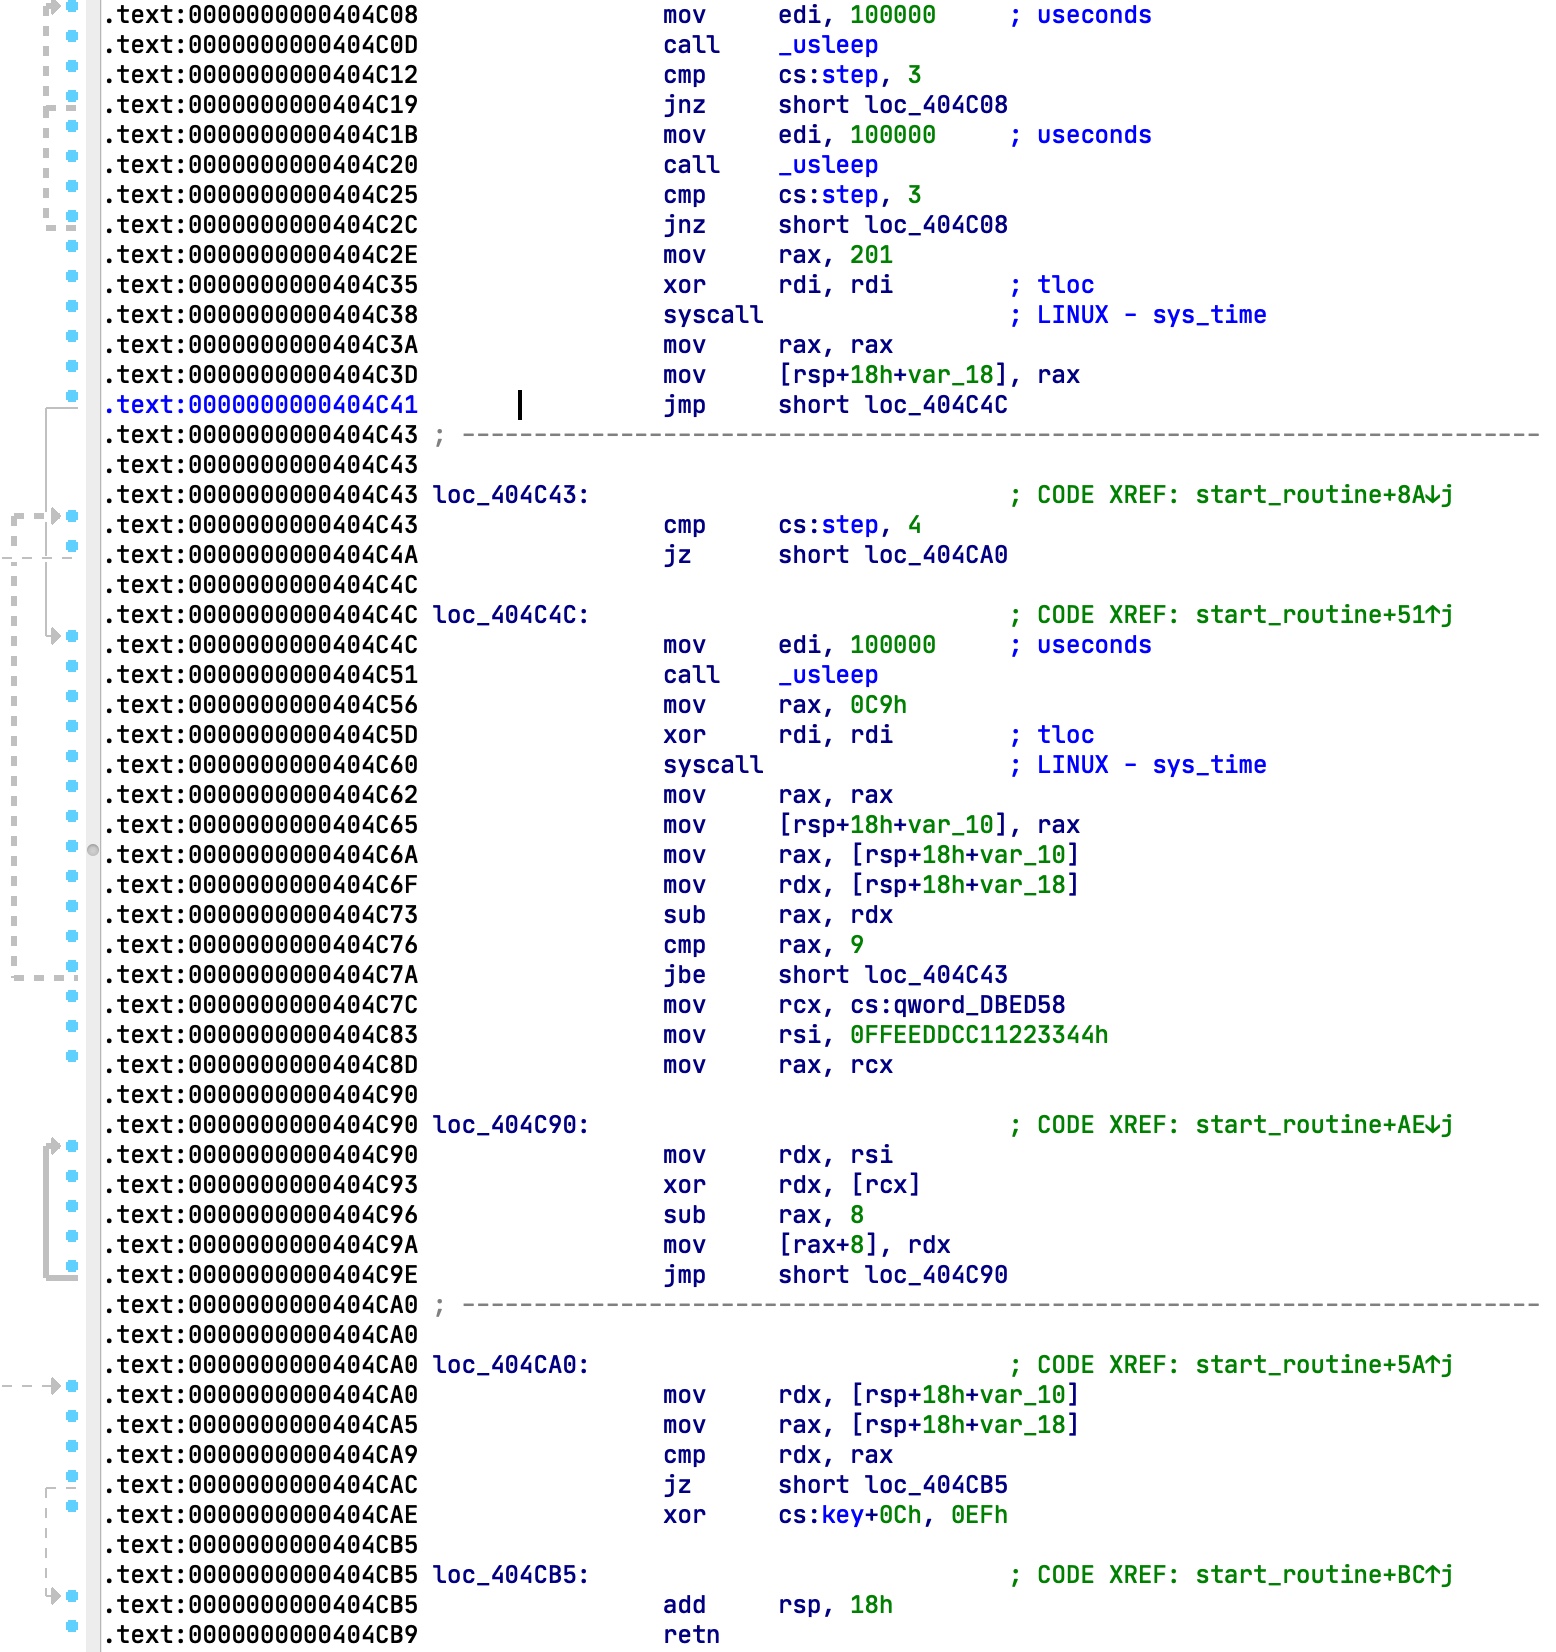
其中有一个地方是线程函数,里面还有对时间的校验
由于这里是用的是系统调用获取时间,所以反编译不太好,我们看汇编代码.

大致逻辑是第三步之前一直sleep.第三步时,先通过系统调用获取时间,再循环睡眠.一旦时间差高于9秒,会将DBED58开始的数据无限循环异或0xffeeddcc11223344.那么必然会触发异常然后gg,除非9秒内进入第四步.
解决方案
我一开始就做歪了,卡了非常久.我一开始想延长8秒的时间限制,进行了大量操作patch主程序和游戏程序,最终确实可以解除8秒限制,但算出来的key总是不对.程序中有大量对key的修改,环环相扣,一个地方错了最终的key也会错.尽管我以为所有的校验都是对的,还是有些地方没处理好,导致key计算错误.
由于没有成功我就不介绍这种方法的具体操作了.
直接修改坐标
这是我解题时的做法.一开始想改时间,后面尝试了hook time函数,确实使得一个time校验失效了.但是还是计算不出来.卡了很久后想能不能hook libc后在libc里面直接改个坐标,传送到终点.
首先经过调试与分析,知道DC0588的指针指向跟位置相关的结构体.我们在调试时查看这里的数据:
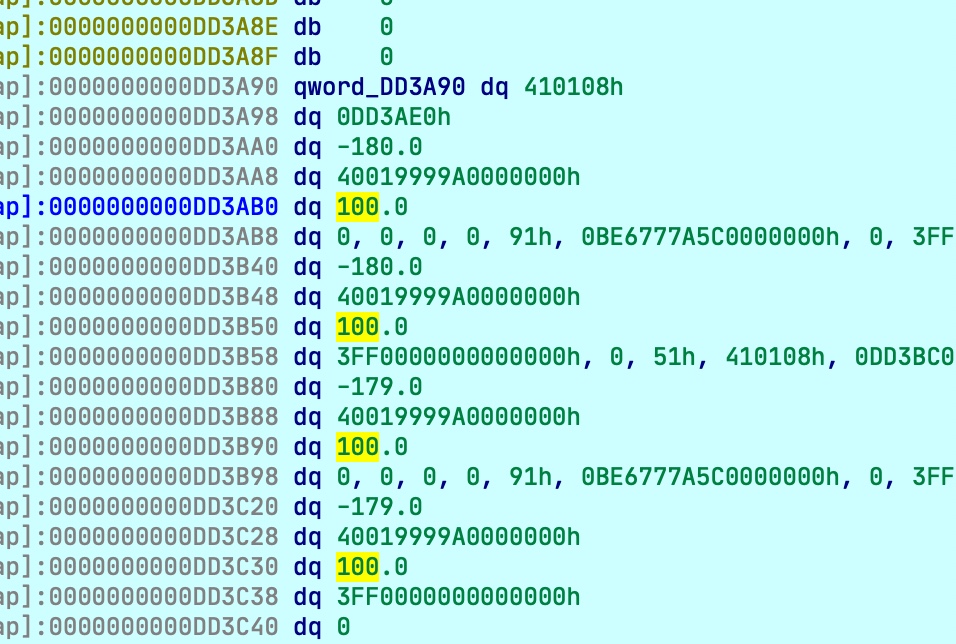
经过测试,四组坐标都要进行修改才能真正进行移动.
那我们的目标就就是想办法运行时修改坐标.
经过一通操作,我想到可以hook 按下Q后的exit函数.不过hook exit的问题是exit是不会返回的,所以要写段shellcode返回到正确的地址,调试时计算一下偏移即可.在末尾加个类似这样的shellcode:
1 | asm("leave\npop %rax\nsub $620, %rax\npush %rax\nret"); |
接下来的问题是,由于程序会校验LD_PRELOAD,所以要想办法绕过这个限制.
我的解决方案是,hook开头的setvbuf函数,将代码中的校验修改掉,经过检验后,在在一个合适的地方hook,把代码修改回去(过check
sum).这里利用的是puts函数,在输出done!和Hello!的时候hook.
然后修改一下elf的代码段权限,改成RWX(不知道为啥用mprotect失败了).
那么能hook了其实可以干很多事.比如hook ptrace来监视对key的修改等等
具体的poc如下:
1 |
|
另外,运行时直接修改/proc/pid/mem应该也可以修改坐标,但我还没试过.这种方法就不用管LD_PRELOAD了.
修改地图
这种方法是赛后和pizza交流,pizza用的.
之前提到,第二部分的地图会被保存到bss上,选完地图后会进行校验.如果我们直接将地图的每一个格子都改成yello box,就可以在8秒内到达了.而且bss段在程序校验的范围之外
由于有签名校验,我们可以先调试,修改地图后从程序中拿修改过的地图的签名,然后在写/proc/pid/mem.